GA4 Events: Types, Setup, and Ecommerce Events for Shopify

The four types of GA4 events and where each is set up, configuring events in GA4 Admin and GTM, recommended ecommerce events and their required parameters, getting purchase tracked on Shopify, and how to check and fix your setup.
Each type of GA4 event is set up in a different place. This guide starts with that map, then covers configuring events in GA4 Admin and GTM, recommended ecommerce events and their parameters, getting purchase tracked on Shopify, and how to check your setup and avoid common mistakes. It’s written for Shopify store owners and marketers using GA4, and for the agencies and developers who handle their tracking. Specs and limits follow Google’s help center and developer docs as of October 2026.
What is a GA4 event?
A GA4 event is a record of something that happened on your site, made up of an event name and parameters (details attached to the event). Unlike Universal Analytics events, which used category, action and label, GA4 records everything as an event, from page views to add to carts to purchases, and carries the details in parameters.
A purchase, for example, uses the event name purchase, with the order ID (transaction_id), amount (value), currency (currency) and list of products (items) as parameters. Metrics such as purchase revenue are calculated from those.
The four types of GA4 events and where to set them up
GA4 events come in four types: automatically collected events, enhanced measurement events, recommended events and custom events. Google’s help center separates them this way: the first two are collected once GA4 is set up (enhanced measurement once it’s turned on), and the last two you implement yourself.
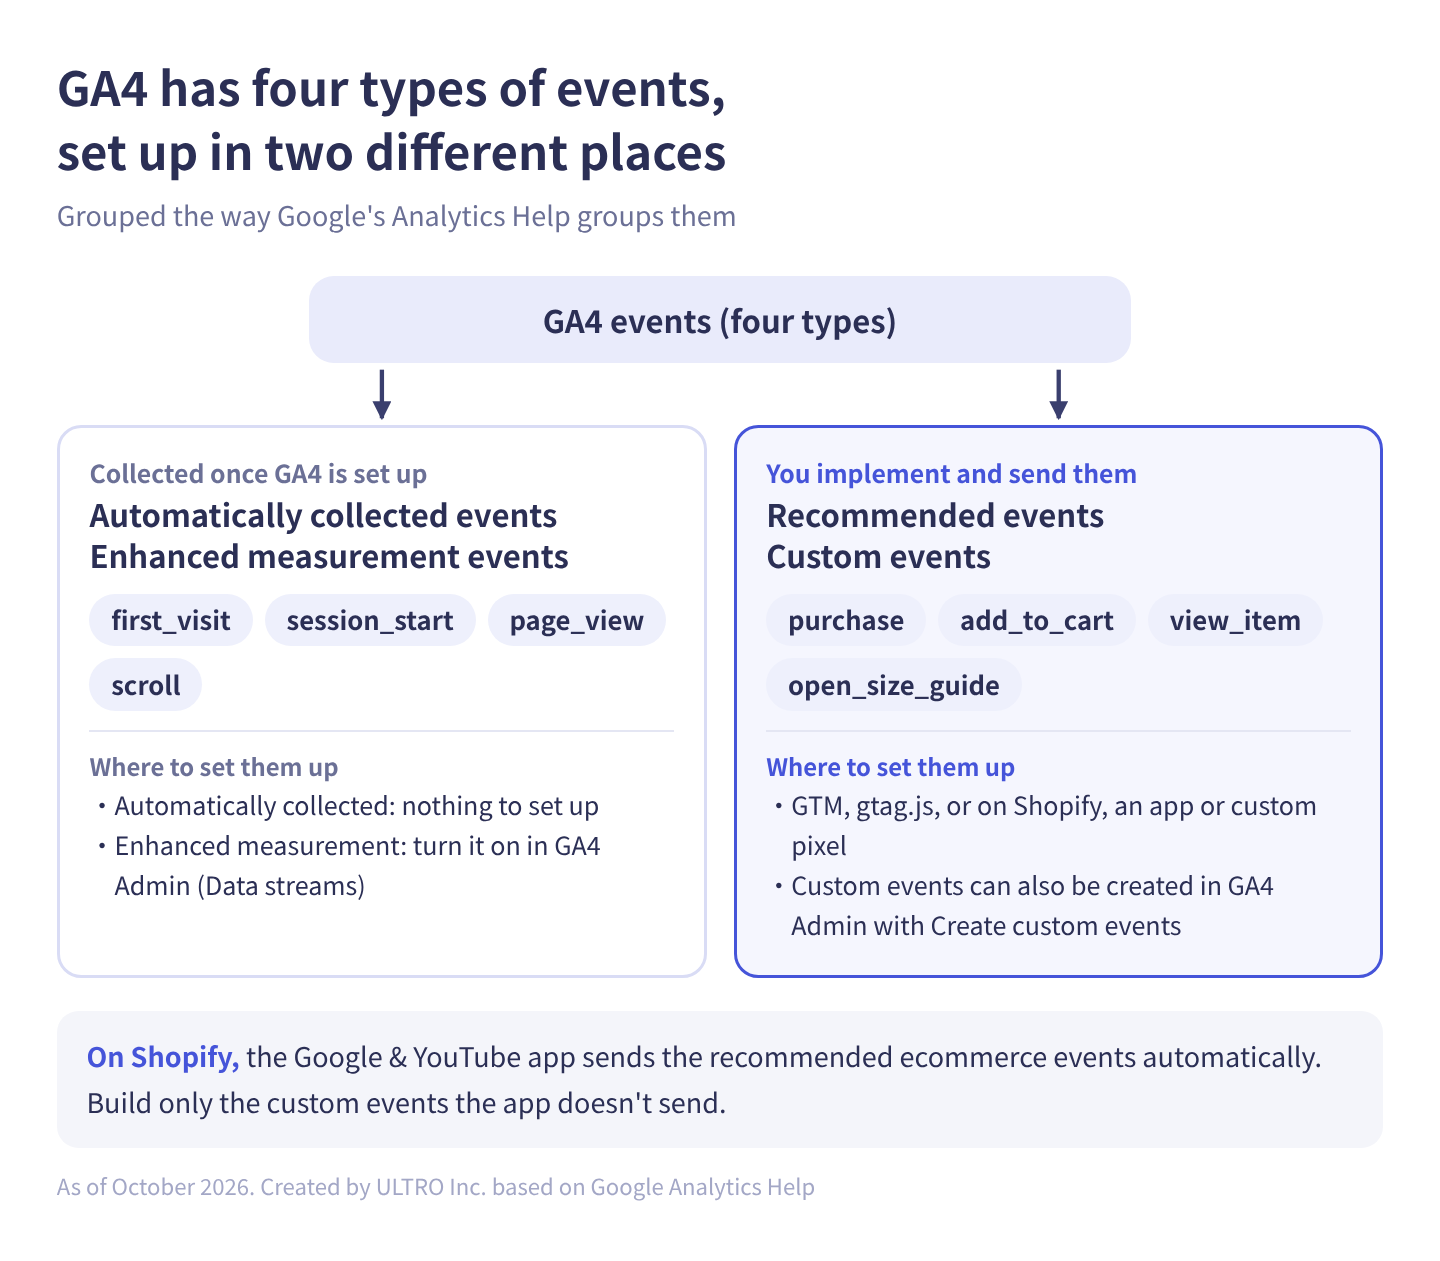
In table form:
| Type | Example events | What it takes | Where to set up | On Shopify |
|---|---|---|---|---|
| Automatically collected | first_visit, session_start, user_engagement | Install the Google tag or GA4 tag | Nothing to set up | Sent once the Google & YouTube app is connected |
| Enhanced measurement | page_view, scroll, click (outbound), view_search_results, video_start and others, file_download, form_start, form_submit | Turn on enhanced measurement | GA4 Admin (Data streams) | Configured in GA4 |
| Recommended | purchase, add_to_cart, view_item, begin_checkout, sign_up, generate_lead and others | Send from your site with Google’s names and parameters | GTM, gtag.js, or a Shopify app or custom pixel | The Google & YouTube app sends the ecommerce events automatically |
| Custom | Names you choose (e.g., size_guide_open) | Define and send them yourself, or create them in GA4 from existing events | GTM and similar; Create custom events in GA4 Admin | Send with a custom pixel or GTM |
If a recommended event fits, send it under the recommended name. Sent with the prescribed parameters, it populates the dimensions and metrics in existing reports automatically, per Google’s help center. Custom events don’t appear in most standard reports, so you’ll look at them in Explorations.
GA4 Admin can only turn enhanced measurement on or off and rewrite or create events from those that arrive. Ecommerce events with product details, or custom events with conditions, can only be sent from your site (GTM, a Shopify app or a custom pixel). You mark an event as a conversion (called a key event since 2024) under Data display > Events.
Setting up events in GA4 Admin (enhanced measurement, modify and create)
Event settings in GA4 Admin all start from Admin > Data collection and modification > Data streams. Select your web stream to open Web stream details.
In the Events section of Web stream details, you’ll find, from top to bottom, Enhanced measurement, Modify events, Create custom events, Measurement Protocol API secrets and data deletion.
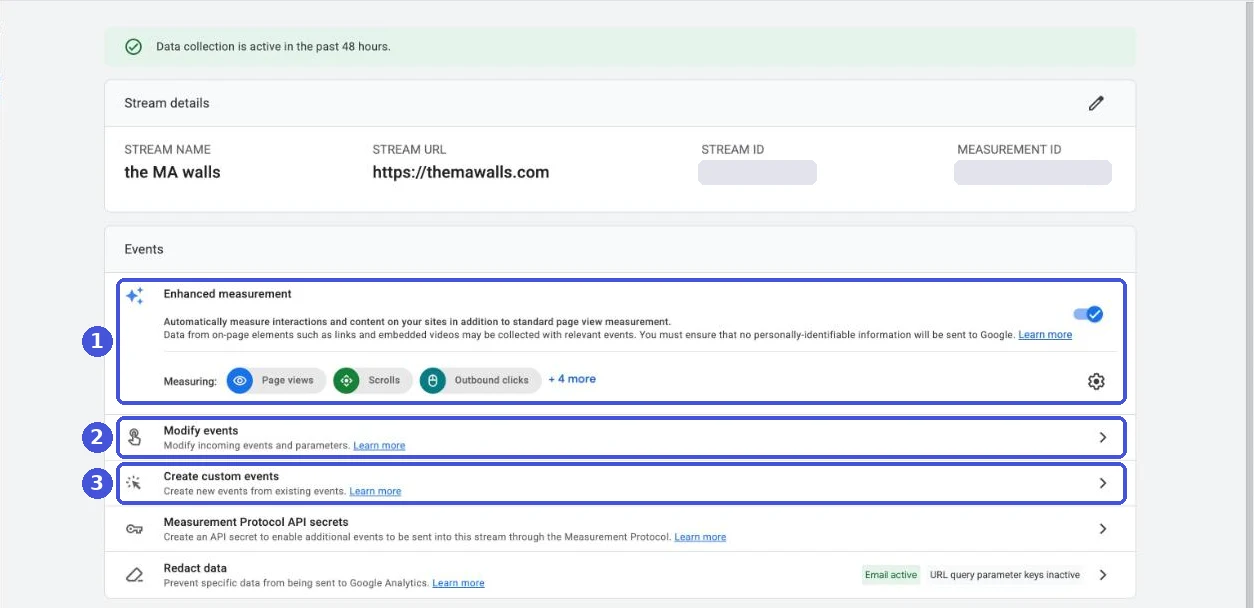
Turning enhanced measurement on and off
Enhanced measurement records scrolls, outbound clicks, site search, video engagement, file downloads and form interactions without code. Turning on the switch enables everything, and the options being measured are listed below it. Click the settings (gear) icon to toggle seven options individually: Page views, Scrolls, Outbound clicks, Site search, Form interactions, Video engagement and File downloads. Click Save at the top right. You need the Editor role or above.
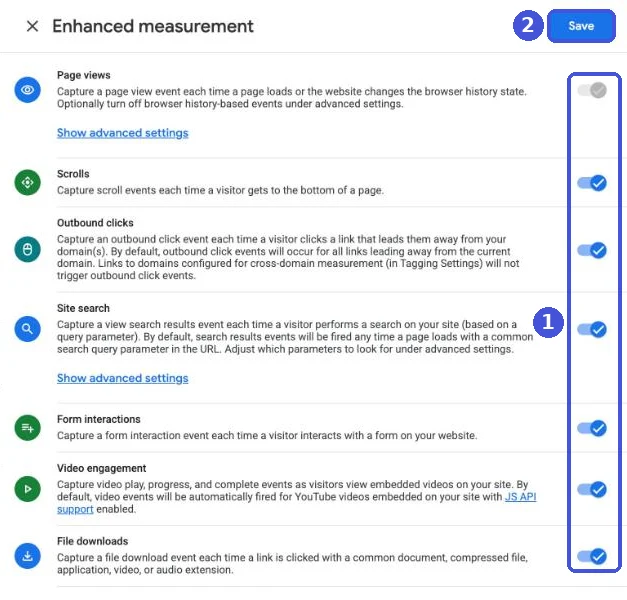
| Event | When it’s recorded |
|---|---|
| page_view | Each page load, or each browser history change by the active site (can’t be turned off) |
| scroll | The first time a user reaches about 90% vertical depth on a page |
| click | A click on a link that leads away from the current domain (domains set up for cross-domain measurement are excluded) |
| view_search_results | A search results page, detected by a search query parameter in the URL |
| video_start / video_progress / video_complete | An embedded YouTube video starts, passes 10, 25, 50 and 75%, and ends (only for embeds with JS API support enabled; depending on how your theme or app embeds videos, they may not be recorded) |
| file_download | A click on a link to a file such as pdf, xlsx, csv, zip or mp4 |
| form_start / form_submit | A user’s first form interaction in a session, and a form submission |
If you plan to count contact form submissions with form events, submit a test yourself and check that form_submit is recorded exactly once. Form parameters such as form_id don’t appear in reports until you register them as custom dimensions.
Creating custom events and modifying existing ones
Modify events rewrites the name or parameters of events as they arrive. Create custom events builds a new event from events that match conditions (for example, page_view on a specific page). Neither needs code.
To create a custom event (as the interface looked in October 2026):
- In Web stream details, click Create custom events, then click Create on the screen that lists your custom events.
- Enter a new event name (for example, view_size_guide). To count it as a conversion, turn on the option to mark it as a key event.
- Leave the creation method on the no-code option, which is selected by default.
- Select the data stream, choose the existing event that should trigger the new one (page_view by default), and under the matching condition (URL contains, by default), enter the target page (for example, /pages/size-guide).
- Click Create in the top right.
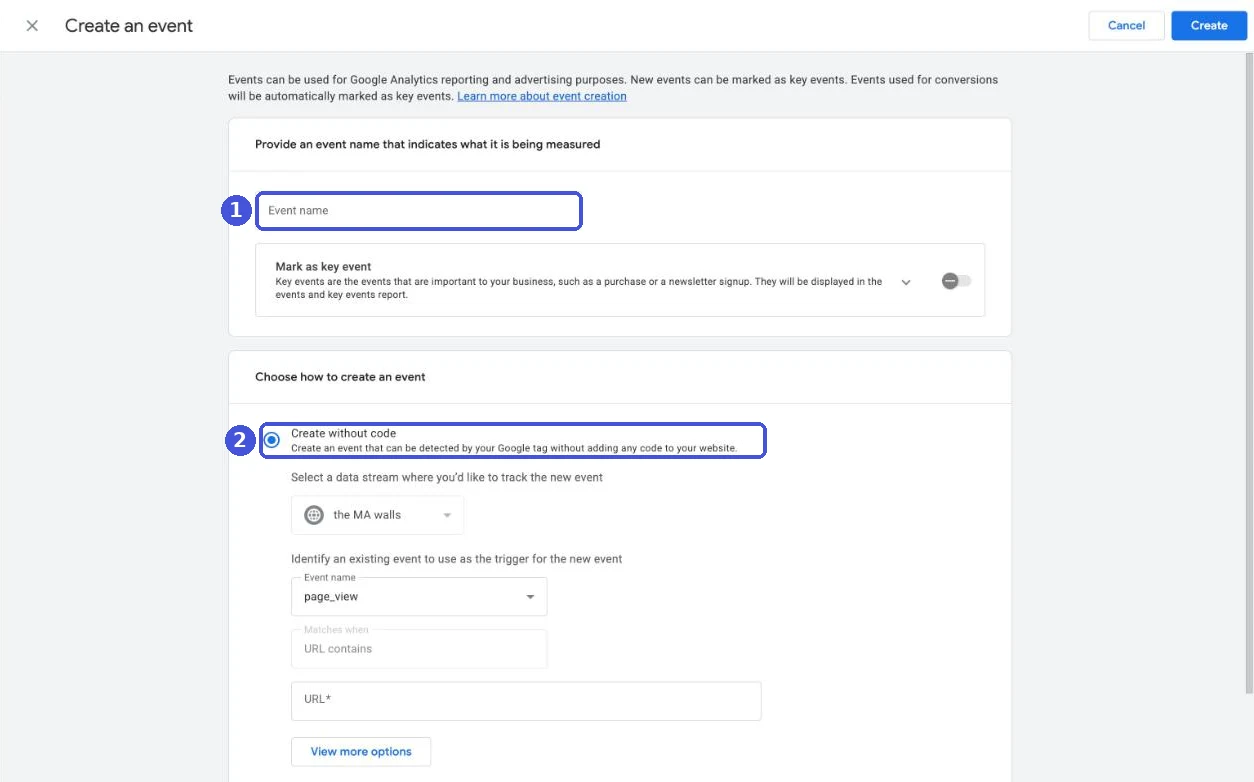
Google’s help center describes this flow with Matching conditions and Copy parameters from the source event, starting from Admin > Data display > Events. The screen looked different in October 2026, but the steps above work.
| Rule | Details |
|---|---|
| Limits | Up to 50 modified events and 50 created events |
| Historical data | Not applied. Only data collected after the change is affected |
| Where it’s processed | Client side, before data is sent to GA4 |
| Server-sent events | Events sent with the Measurement Protocol or other server-to-server setups can’t be modified |
| Order | Modifications run first, then created events. Modifications run in the order listed |
| Role required | Editor or above |
| Time to take effect | An hour or more |
Google’s help center notes that with gtag.js you can’t create or modify events based on parameters inside items (such as item_name), and that modifying page_view can stop page views from being recorded for other pages. If you want to keep the original event, create a new one instead of modifying it.
Events created in Admin can’t calculate values or attach product details, so they’re not a way to build purchase or other ecommerce events. Creating purchase from a thank you page view is also a common cause of double counting alongside an app’s purchase event.
How to send GA4 events with GTM
To send GA4 events with Google Tag Manager, create a Google Analytics: GA4 Event tag and use a trigger to decide when it fires.
- In GTM, create a new tag and, under Tag Configuration, select Google Analytics > Google Analytics: GA4 Event.
- Enter your GA4 measurement ID (the one starting with G-) as the Measurement ID.
- Enter the Event Name and add Event Parameters if needed.
- For ecommerce events, under More Settings > Ecommerce, check Send Ecommerce data and set Data source to Data Layer.
- Add a trigger. For ecommerce events, use a Custom Event trigger matching the event name your site pushes to the data layer (such as purchase).
- Test in preview mode, then publish.
Example: tracking clicks on a phone number link
Button and link clicks follow the same pattern. Here’s how to send clicks on a phone number link (tel:) as an event called click_tel.
- Check that GTM has a Google tag with your GA4 measurement ID firing on all pages.
- Make sure the Click URL built-in variable is enabled (if not, enable it under Variables > Built-In Variables).
- Under Triggers > New, set the trigger type to Click - Just Links, choose Some Link Clicks, and set the condition to Click URL contains tel:.
- Create a Google Analytics: GA4 Event tag with the Event Name click_tel and attach the trigger from step 3.
- In preview mode, click the phone link, check that the tag fires and click_tel arrives in GA4’s DebugView, then publish.
For other buttons, change the Click URL condition to that link’s destination.
Sending ecommerce events
Google’s documentation shows two patterns: putting the built-in {{Event}} variable in the Event Name field to send all ecommerce events with one tag, and clearing the previous ecommerce object with dataLayer.push({ ecommerce: null }); before pushing a new one to the data layer (the place your site hands data to GTM).
On Shopify, GTM installed in your theme doesn’t run on checkout or the thank you page. To send purchase, install GTM as a custom pixel under Settings > Customer events and push Shopify’s events to the data layer. For code and caveats, see our Shopify custom pixel guide.
Recommended ecommerce events and required parameters (view_item to purchase)
GA4’s ecommerce events are recommended events whose names and parameters Google defines: 14 of them, from viewing a product list (view_item_list) through purchase and refund. Sent with these names and parameters, they populate ecommerce reports such as Ecommerce purchases. They aren’t sent automatically, so you either implement them on your site or, as on Shopify, let an app send them.
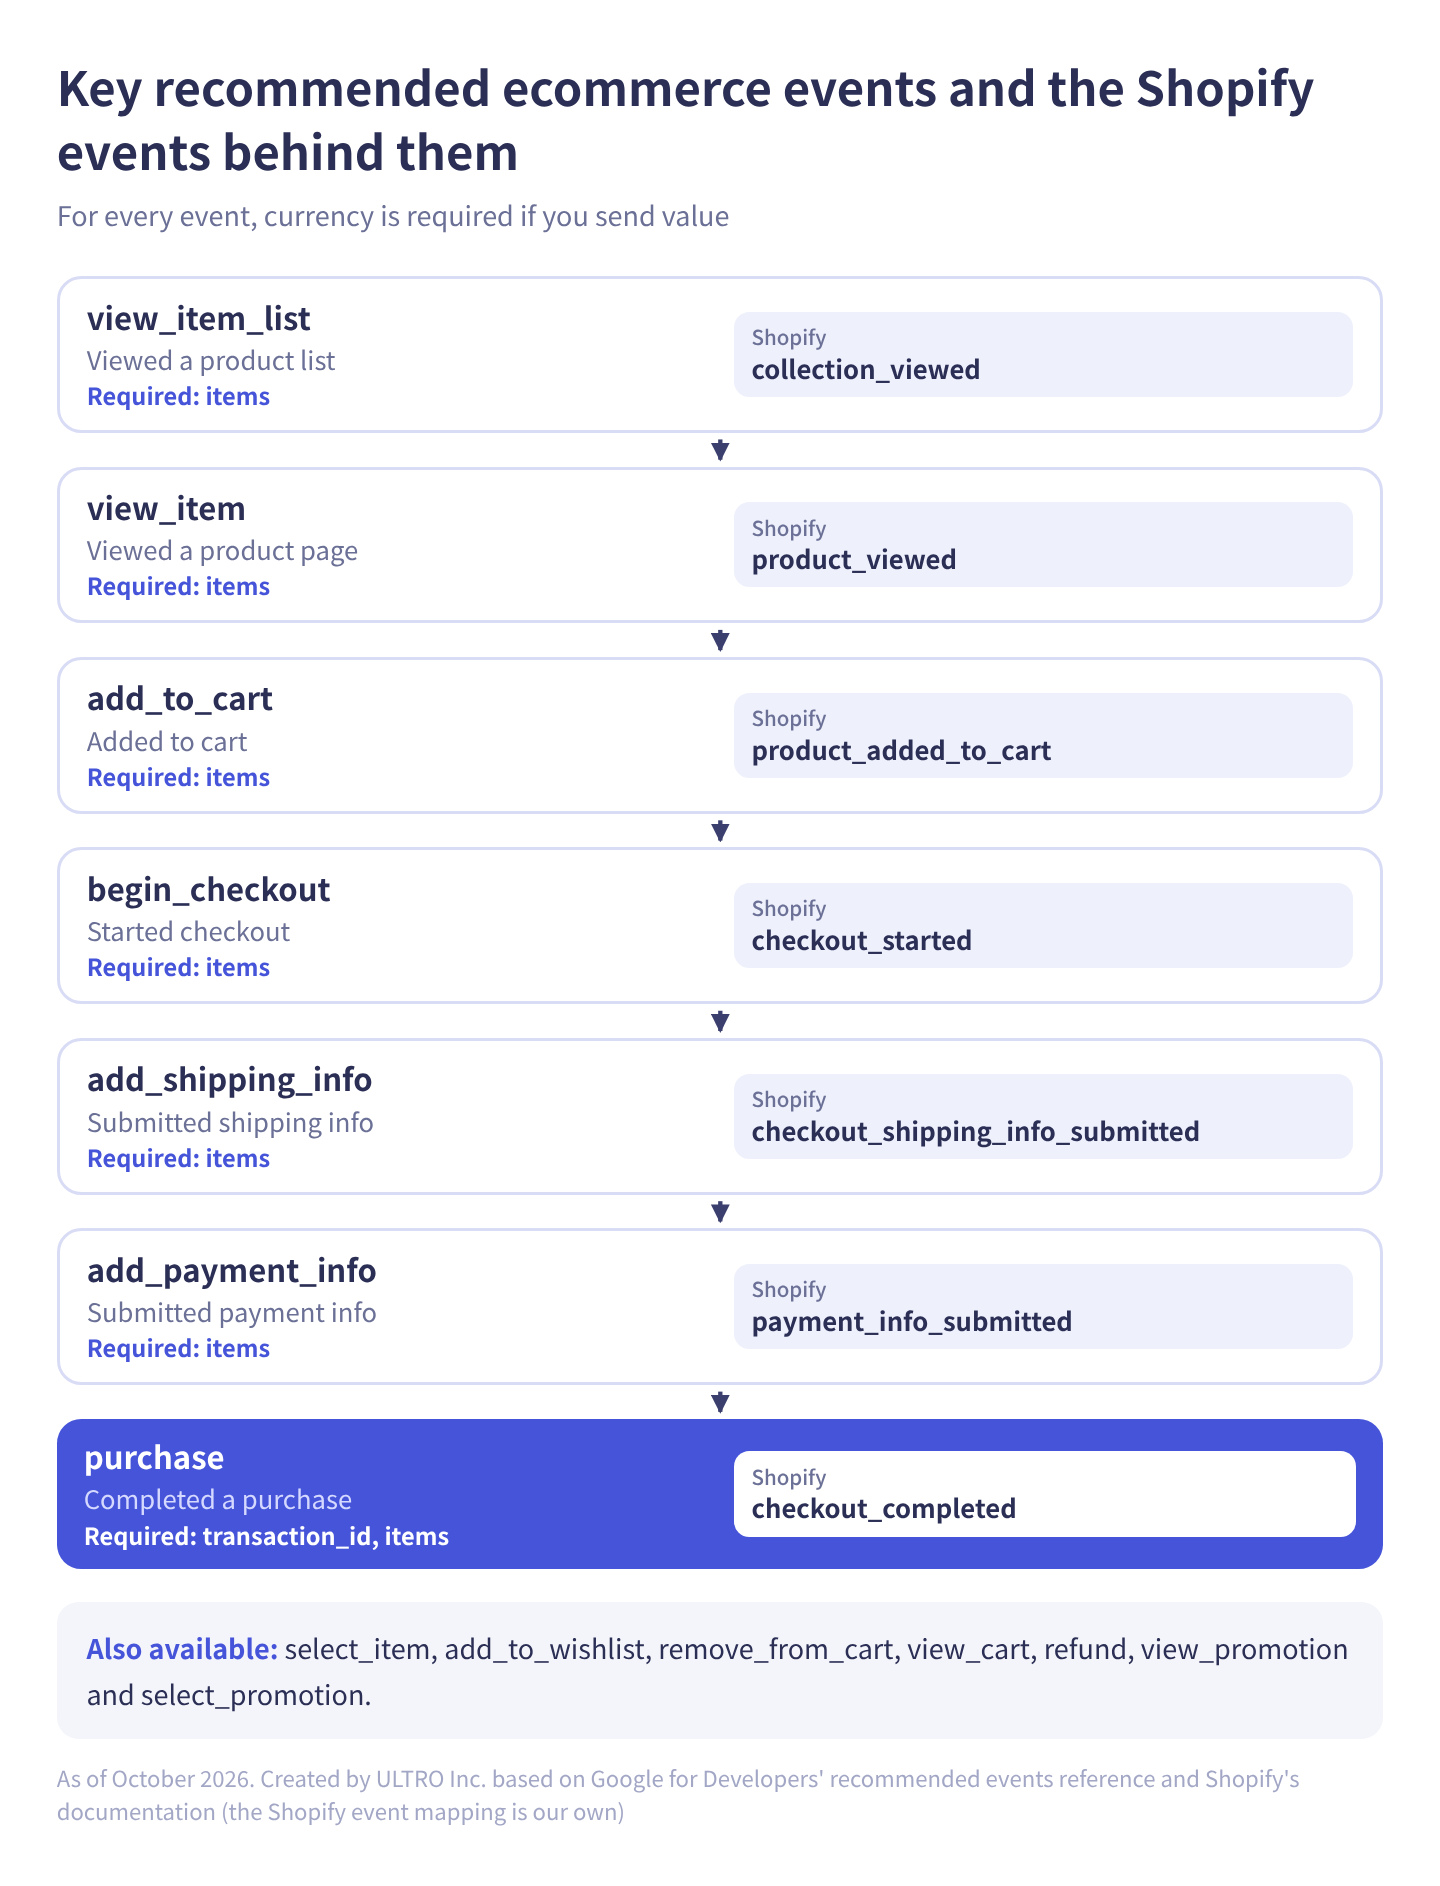
All 14 in table form:
| Event | When to send | Required parameters | Shopify standard event |
|---|---|---|---|
| view_item_list | A product list is viewed | items | collection_viewed |
| select_item | A product is selected from a list | items | — |
| view_item | A product page is viewed | items (currency if you send value) | product_viewed |
| add_to_wishlist | Added to a wishlist | items (same) | — |
| add_to_cart | Added to cart | items (same) | product_added_to_cart |
| remove_from_cart | Removed from cart | items (same) | product_removed_from_cart |
| view_cart | Cart viewed | items (same) | cart_viewed |
| begin_checkout | Checkout started | items (same) | checkout_started |
| add_shipping_info | Shipping info submitted | items (same). shipping_tier is optional | checkout_shipping_info_submitted (our mapping) |
| add_payment_info | Payment info submitted | items (same). payment_type is optional | payment_info_submitted |
| purchase | Purchase completed | transaction_id, items (same) | checkout_completed |
| refund | Refund issued | transaction_id (currency if you send value) | None (send from a server) |
| view_promotion | A promotion such as a banner is viewed | items | — |
| select_promotion | A promotion is clicked | None (some reports won’t show it without items) | — |
In Google’s reference tables, value and currency are marked “Yes*” (conditionally required). value is typically required for meaningful reporting, and if you send value, currency is required. value on view_item doesn’t contribute to revenue. The Shopify column is our own mapping; ”—” means there’s no matching standard event. Google’s Shopify documentation doesn’t name a source event for add_shipping_info, so we map it to checkout_shipping_info_submitted.
purchase parameters
purchase requires transaction_id and items, and currency if you send value.
| Parameter | Required | What it holds | Watch out for |
|---|---|---|---|
| transaction_id | Yes | A unique order ID | Used to prevent duplicate purchases. Use the same format (order number vs. order ID) across every path |
| value | Yes* (conditional) | Sum of price × quantity across items | Excludes shipping and tax per Google’s reference. Send as a number |
| currency | Required if value is sent | Three-letter currency code (USD) | Without it, revenue isn’t calculated correctly |
| customer_type | No | new or returning | new is recommended if there’s no purchase in the last 540 days. Leave it out when you can’t tell, such as guest checkouts |
| items | Yes | Products purchased | See the next table |
Optional parameters also include tax, shipping and coupon.
The value sent by Shopify’s Google & YouTube app has been the post-discount amount since April 2025, excluding shipping and tax. If you send purchase from another path, use the same value definition as the other paths into the same property.
items parameters
items is an array of product details, and each item needs either item_id or item_name. Product-level details go inside items; details about the whole action (such as transaction_id) go outside it.
| Parameter | What it holds | Watch out for |
|---|---|---|
| item_id | Product ID (SKU, etc.) | Either item_id or item_name is required. Match the format used by other paths |
| item_name | Product name | Same |
| price | Unit price | If discounted, use the discounted unit price and put the discount in discount |
| quantity | Quantity | Defaults to 1 if not set |
| discount | Discount per unit | — |
| item_variant | Variant (color, size, etc.) | — |
You can also send item_brand, item_category through item_category5, item_list_id and item_list_name (which list the item was shown in; the item-level value takes priority), coupon, index and more. An event can include up to 200 items, and beyond the prescribed parameters you can add up to 27 custom item parameters. Custom item parameters don’t appear in reports until you register them as item-scoped custom dimensions.
Example code for sending purchase
Here’s an example using gtag.js. With GTM, push the same content to the data layer in the form event: "purchase" with ecommerce: {...}.
gtag("event", "purchase", {
  transaction_id: "1001",
  currency: "USD",
  value: 100.00,   // sum of price × quantity, excluding shipping and tax (Google's definition)
  tax: 8.25,
  shipping: 0,
  coupon: "WELCOME10",
  items: [{
    item_id: "SKU-001",
    item_name: "Art Print A2",
    item_brand: "Your Brand",
    item_category: "Prints",
    item_variant: "A2",
    price: 50.00,   // unit price before tax
    quantity: 2
  }]
});
This example follows Google’s definition and sends value without tax or shipping. Some stores send value including tax or shipping instead. Either works, as long as every path sending to the same property uses the same definition.
GA4 event limits and naming rules
GA4 event names and parameter names can be up to 40 characters, and an event can have up to 25 parameters. Anything over the limit isn’t recorded.
| Limit | Standard property |
|---|---|
| Event name length | 40 characters |
| Parameters per event | 25 |
| Parameter name length | 40 characters |
| Parameter value length | 100 characters (page_title 300, page_referrer 420, page_location 1,000) |
| Custom dimensions | 50 event-scoped, 25 user-scoped, 10 item-scoped (125, 100 and 25 for Analytics 360) |
Limits are the same for single-width and double-width characters, but URLs are counted by their encoded length, so URLs containing non-ASCII characters (in page_location, for example) count as longer than they look. Google’s help center also says an event whose name exceeds 40 characters won’t be reported as a key event even if you mark it as one. Server-sent events have separate limits (see the GA4 Measurement Protocol guide).
Three rules for event names:
- Start with a letter, and don’t use spaces. Google’s naming help says both that non-English characters are allowed and that only letters, numbers and underscores are allowed, so lowercase letters and underscores are the safe choice
- Names are case-sensitive (purchase and Purchase are different events)
- Reserved names such as session_start, page_view and user_engagement can’t be used
Name custom events as verb plus object (for example, open_size_guide) and keep a list of names and firing conditions. That way, when someone else works in GTM later, the same action doesn’t end up tracked under two names.
Connecting Shopify: Google & YouTube app or custom pixel
For sending GA4 ecommerce events from Shopify, the Google & YouTube app is usually enough. It sends the recommended events from view_item through purchase based on Shopify’s standard events, and it runs on checkout and the thank you page. A custom pixel (with GTM or similar) lets you control parameters and send custom events, but you have to map the ecommerce events yourself. As a rule, build only the custom events the app doesn’t send.
If you use both, send purchase through one path only. If the app already sends purchases and your custom pixel also sends purchase, the same order can be recorded twice. Either send only custom events from the custom pixel, or disconnect Google Analytics in the app settings and consolidate everything in the custom pixel.
For connecting through the app and the events it sends, see How to connect Shopify to GA4.
How to check events are arriving (Realtime, DebugView, Tag Assistant)
After setting up events, use GA4’s Realtime report to check that they arrive, and DebugView (under Admin > Data display) to check each event’s parameters. Ecommerce data can take up to 24 hours to appear in standard reports and Explorations, so check Realtime first.
To see events in DebugView, connect your site in Tag Assistant (tagassistant.google.com) or use GTM’s preview mode to enable debug mode, then use the site. Per Google’s help center, if you’ve implemented consent mode and haven’t consented to analytics cookies, your events won’t appear in DebugView. On a store with a consent banner, accept cookies in your own browser before testing.
Per Shopify’s help center, Tag Assistant doesn’t detect tags inside Shopify custom pixels. In that case, combine Shopify Pixel Helper (a browser extension that shows what happened in customer events) with DebugView. For reading Tag Assistant, see our Google Tag Assistant guide.
To test purchase end to end, place a real order for an inexpensive product and check five things in DebugView:
- purchase arrives exactly once (twice means paths overlap)
- transaction_id uses the same format (order number or order ID) as your other paths
- currency is USD (or your store currency)
- value matches the definition you chose (with or without shipping and tax)
- items contains the products, and item_id uses the same format as your other paths
The basic test of any tracking setup is that each action is recorded exactly once.
Common GA4 event setup mistakes
The most common mistakes are double-counted purchases, misspelled names or parameters, and parameters that never show up in reports.
| Symptom | Common cause | Fix |
|---|---|---|
| More purchases than Shopify orders | purchase is sent by both the app and a custom pixel (GTM), or purchase was created from the thank you page with Create custom events | Send through one path. Delete the purchase event created in Admin |
| Not in ecommerce reports | The event name differs from the recommended name (Purchase, addToCart, etc.), or items is missing | Send with the recommended name and items structure |
| Revenue is 0 or wrong | currency is missing, or value is sent as a string or with commas | Add currency and send value as a number |
| The same product appears on two rows in product reports | item_id format (SKU vs. product ID) differs by path | Use one item_id format |
| A parameter you send isn’t in reports | It isn’t registered as a custom dimension (data from before registration won’t appear later) | Register it under Data display > Custom definitions |
To identify double-counted purchases, see Duplicate purchases in GA4. For cases where the way events are sent leaves the source as (not set), see Why GA4 shows (not set) or direct.
A custom dimension’s scope can’t be changed after you save it. Register parameters inside items as item-scoped and event-wide parameters as event-scoped.
Per Google’s help center, when you link Google Ads with ads personalization enabled, seven events are also marked as key events automatically: add_to_cart, add_to_wishlist, begin_checkout, session_start, view_item, view_item_list and view_search_results. While you’re setting up events, review your key events list too. Importing them as Google Ads conversions is a separate setting.
Even with purchase set up correctly, some orders never reach GA4
Even with purchase set up correctly, some Shopify orders never reach GA4. The checkout_completed event fires when the thank you page loads (or the first upsell page, if you show a post-purchase upsell), and doesn’t fire if that page never loads. That includes buyers who pay off-site and never come back, and hits blocked by ad blockers.
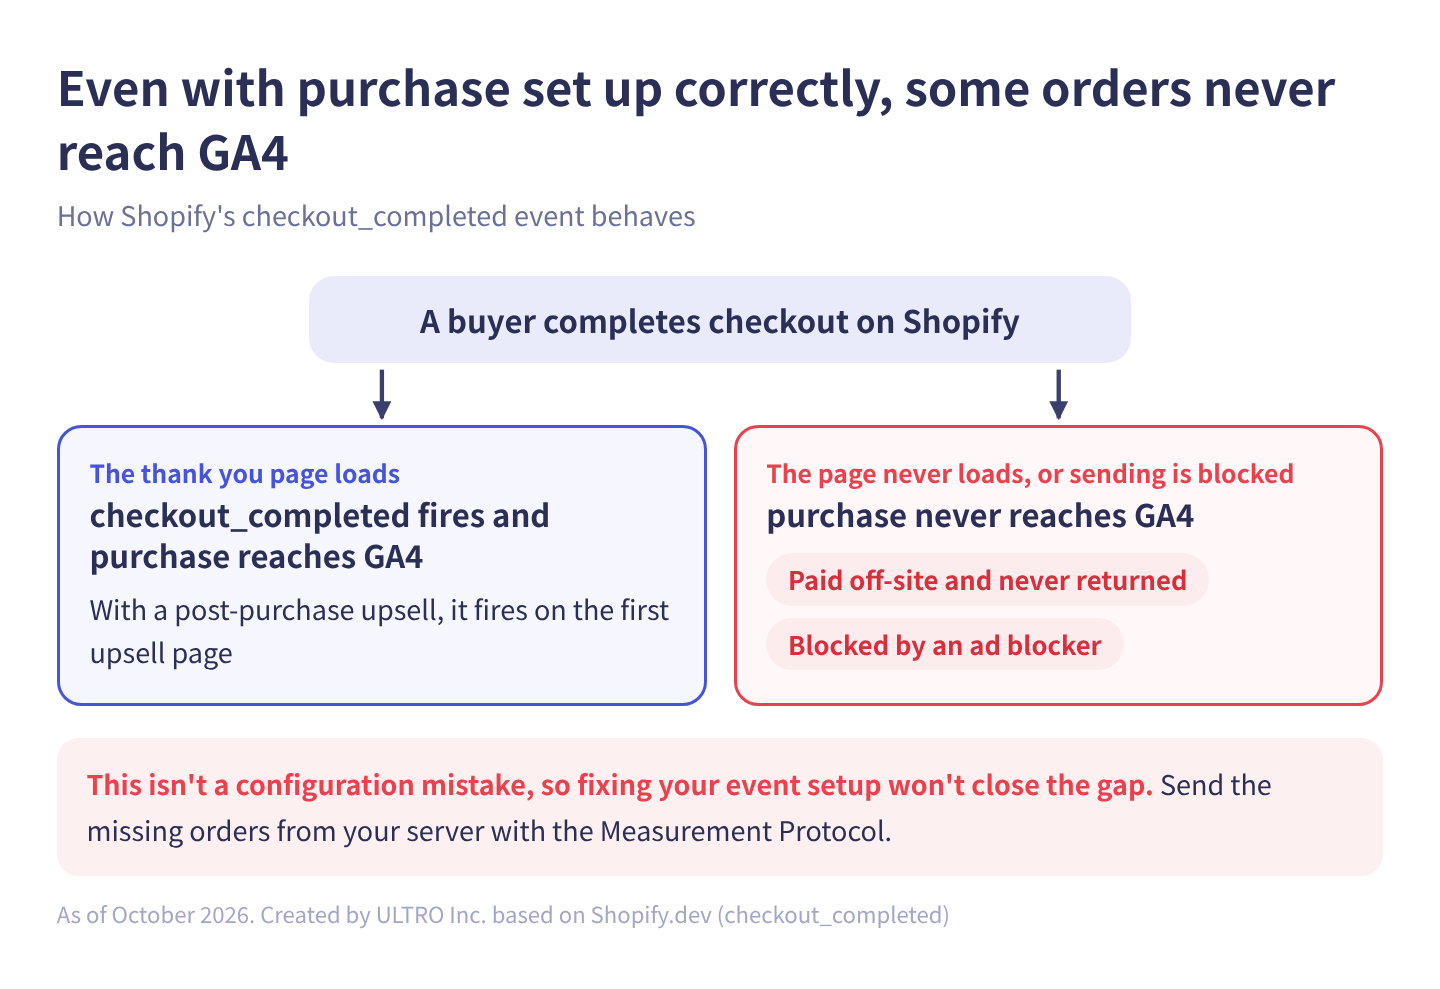
This isn’t a configuration mistake, so reworking your event setup won’t close the gap. At one of our clients’ Shopify stores, 21% of orders were missing from GA4. For the causes and how to check your own store, see GA4 Not Tracking All Shopify Purchases?
To add the missing orders to GA4, you can send them from your server with the Measurement Protocol. We built that into a Shopify app, GapFill. It’s our own product, so read with that in mind. It recovers missing GA4 purchase events server-side: on the Standard plan ($19/month, 200 events included), it sends only the orders that never reached GA4, as purchases tied to the original visit’s session when the client and session IDs were captured at checkout. It works alongside your existing tags, and the missing purchases report is free.
Our Shopify appGapFill: Recover missing GA4 purchase events server-sideWorks alongside your existing tags. Free missing purchases report.See GapFill →Sources
- [GA4] About events (Google Analytics Help)
- [GA4] Automatically collected events (Google Analytics Help)
- [GA4] Enhanced measurement events (Google Analytics Help)
- [GA4] Recommended events (Google Analytics Help)
- [GA4] Modify and create events (Google Analytics Help)
- [GA4] Create or modify events (Google Analytics Help)
- Event naming rules (Google Analytics Help)
- [GA4] Event collection limits (Google Analytics Help)
- [GA4] About custom dimensions and metrics (Google Analytics Help)
- [GA4] Set up ecommerce events (Google Analytics Help)
- [GA4] Monitor events in DebugView (Google Analytics Help)
- Mark events as key events (Google Analytics Help)
- Measure ecommerce (Google for Developers)
- Measure ecommerce: Tag Manager (Google for Developers)
- Recommended events reference (Google for Developers)
- Shopify events and parameters (Google Tag Platform)
- Creating a Google Tag Manager custom pixel (Shopify Help Center)
- checkout_completed (Shopify.dev)
FAQ
Where do you set up events in GA4?
It depends on the type. Turning enhanced measurement on or off, modifying existing events, and creating new events from existing ones are done in GA4 Admin, starting from Data streams. Recommended events such as purchase and your own custom events are sent from your site with GTM or gtag.js. On Shopify, the Google & YouTube app or a custom pixel sends them.
What's the difference between recommended events and custom events in GA4?
Recommended events, such as purchase and add_to_cart, have names and parameters defined by Google. Sent with those names, they populate ecommerce and other reports automatically. Custom events are named by you and don't appear in most standard reports, so you analyze them in Explorations. If a recommended event fits, use the recommended name.
Which parameters are required for the GA4 purchase event?
Per Google's event reference, transaction_id and items are required. value and currency are conditionally required: value is typically needed for meaningful reporting, and if you send value you must send currency (a three-letter code such as USD). Each item needs either item_id or item_name. value is the sum of price times quantity, excluding shipping and tax.
How should I name GA4 events?
Use lowercase letters and underscores, such as open_size_guide. Names are case-sensitive, can be up to 40 characters, must start with a letter, and can't contain spaces. Reserved names such as session_start and page_view can't be used. Google's naming help isn't fully consistent about non-English characters, so sticking to plain ASCII is the safe choice.
Can I create the purchase event with Create custom events in GA4 Admin?
We don't recommend it. A purchase created from a thank you page view has no transaction_id or items and can double count purchases a Shopify app already sends. Events created in Admin also don't apply to historical data or to events sent from a server with the Measurement Protocol. Send purchase from your site with the required parameters.
Why don't my GA4 events show up?
Standard reports can take up to 24 hours to update. To check right away, use Realtime or DebugView. If you've implemented consent mode and haven't consented to analytics cookies, your events won't appear in DebugView. Custom parameters don't appear in reports until you register them as custom dimensions.
- GA4 has four types of events. Automatically collected and enhanced measurement events are handled in GA4 Admin; recommended and custom events are sent from your site.
- Modify events and Create custom events in Admin are limited to 50 each, and don't apply to historical data or server-sent events.
- purchase requires transaction_id and items, plus currency if you send value. Each item needs item_id or item_name.
- On Shopify, the Google & YouTube app usually sends the ecommerce events. Send purchase through one path only.
- Check with Realtime and DebugView, and register custom parameters as custom dimensions.
- Even with purchase set up correctly, orders whose thank you page never loaded don't reach GA4.
Written byRyushi Nagata
CEO, ULTRO Inc. (Tokyo)Shopify Partner. Ryushi handles Shopify store builds, maintenance, advertising and CRM end to end, and has managed more than ¥4 billion in ad spend over his career. He holds Google Ads certifications (Search, Display, Video, Shopping, Apps, Performance Max, Measurement) and the Google Analytics certification.
How many purchases is GA4 missing in your store?
GapFill matches your Shopify orders against GA4 purchases, shows what GA4 missed, and recovers those purchase events server-side. It works alongside your existing tags, and the missing purchases report is free.