Shopify Custom Pixels: Setup, GA4 Events, and Google Tag Manager

How Shopify custom pixels and their sandbox work, how to add and test one, how standard events map to GA4, how to run Google Tag Manager inside a custom pixel, where heatmap tools like Hotjar and Microsoft Clarity fit, consent, and capturing GA4 IDs for the Measurement Protocol.
On Shopify, you can’t add tags to checkout or the Thank you page from your theme. The way to carry GA4, Meta, TikTok, and other tracking through checkout is a pixel added under Customer events in the admin. When no app covers what you need to track, or you want to manage tags together in Google Tag Manager, you add your own code as a custom pixel.
This guide is for anyone who handles GA4 or GTM tracking on a Shopify store. It covers how custom pixels work and what they can’t do, how to add one, how standard events map to GA4, where GTM tends to trip people up, where heatmap tools fit, consent, and how to capture (read and store) the GA4 client ID for the Measurement Protocol. Specs follow Shopify’s help center and developer docs as of October 2026.
What is a Shopify custom pixel?
A custom pixel is JavaScript you register in the Shopify admin to send store activity to outside tracking tools. Shopify emits page views, product views, add to cart, completed checkout, and other activity as customer events, and a pixel subscribes to them and forwards them to GA4, Meta, and so on.
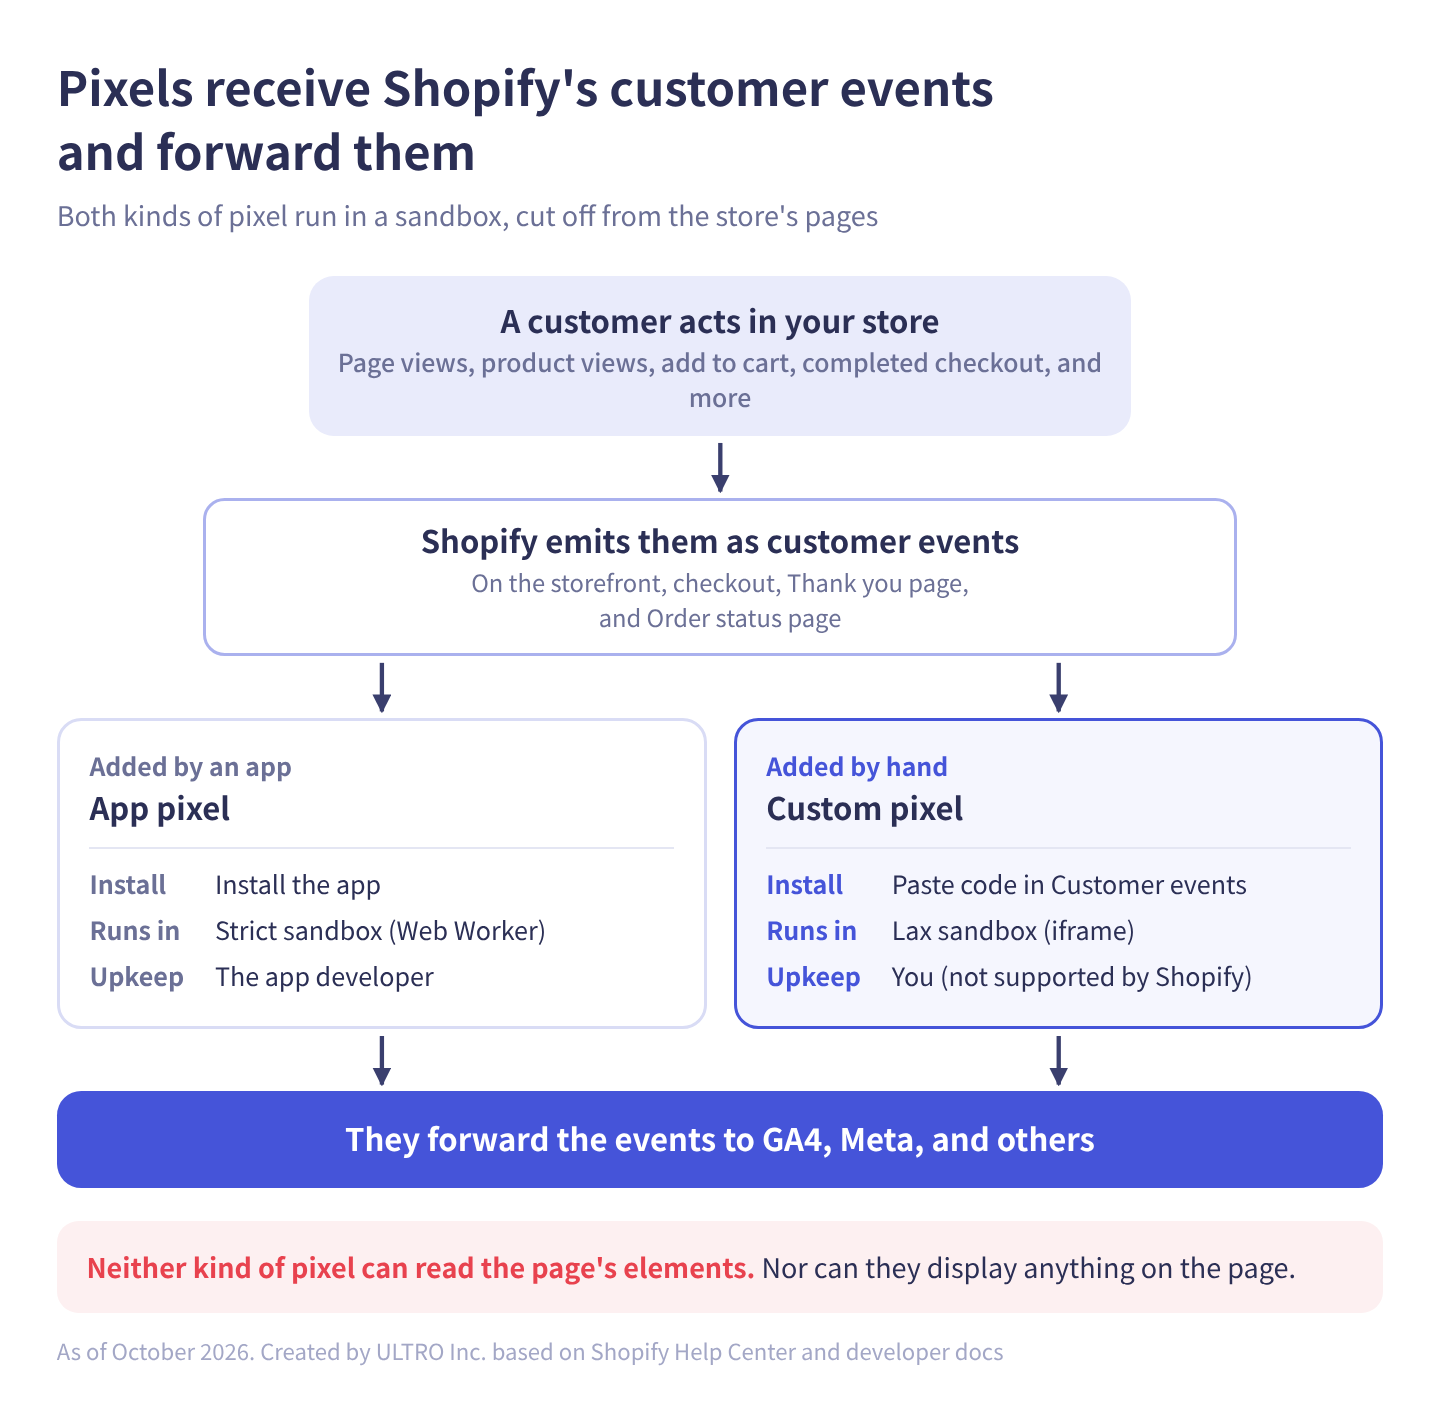
Pixels load automatically on the storefront, checkout, the Thank you page, and the Order status page. Tags used to go in theme.liquid or the checkout’s Additional scripts, but Additional scripts is now read-only, and non-Plus stores reached their Thank you page upgrade deadline on August 26, 2026. Pixels are now the only way to track through checkout. GA4 Not Tracking All Shopify Purchases? explains the background.
There are two kinds of pixel: app pixels installed by apps, and custom pixels you add by hand. Compared with a tag pasted into the theme:
| App pixel | Custom pixel | Tag in the theme | |
|---|---|---|---|
| How it’s added | Install an app | Paste code into Customer events | Paste into theme.liquid or similar |
| Where it runs | Storefront, checkout, Thank you, and Order status pages | Same | Storefront pages only |
| Environment | Stricter sandbox (strict, Web Worker) | Looser sandbox (lax, iframe) | The page itself |
| Can read page elements | No | No | Yes |
| Shopify’s consent settings apply | Yes | Yes | No |
| Maintained by | The app developer | You (not supported by Shopify) | You |
Sandbox limits (lax vs. strict)
Pixels run in a sandbox cut off from the store’s pages, so they can’t read page elements or display anything on the page. This keeps pixels from collecting data outside what they’re given or interfering with checkout. Shopify’s developer docs say app pixels run in a strict sandbox using a Web Worker, and custom pixels in a lax sandbox: an iframe with the sandbox attribute set to allow-scripts and allow-forms.
The lax sandbox makes ordinary JavaScript tags (gtag.js, GTM, the Meta pixel code) easier to drop in, with these limits:
| What doesn’t work or behaves differently | Workaround |
|---|---|
| Reading button clicks, form values, outbound link clicks, and other page elements | Use the data in standard and DOM events. If that’s not enough, edit theme code to publish your own events (Shopify.analytics.publish(), developer work) |
| Page URLs are wrong (the iframe returns the sandbox URL instead of the store page) | Use the page information in events such as page_viewed (event.context) |
| Showing buttons, banners, or anything else on the page | Not possible |
| Tracking scrolling or mouse movement | Not possible |
Reading the page’s cookies with document.cookie | Use browser.cookie.get(), which runs asynchronously in the top frame |
HTML <script src=...> tags | Create the script element in JavaScript |
Heatmap tools like Hotjar and Microsoft Clarity don’t belong in a custom pixel
A custom pixel fires inside an iframe, so tags that read the page directly, or depend on its URL or elements, may not work. Shopify’s help center lists “clicks and mouse movement to create heatmaps from DOM scraping” among what pixels can’t collect, along with outbound link clicks and page scrolling. Heatmaps and session recordings are built on exactly that data, so pasting their script into a custom pixel doesn’t give you usable heatmaps.
Here’s what the two most common tools document for Shopify:
| Tool | Where it’s installed | Checkout and Thank you page |
|---|---|---|
| Hotjar | Its help center says to paste the tracking code in theme.liquid just before </head>, and that this covers the storefront only | Hotjar says Shopify’s built-in checkout doesn’t support third-party scripts such as its tracking code, and that code installed in a Shopify sandbox collects no data |
| Microsoft Clarity | The Microsoft Clarity Shopify app adds the Clarity script to the storefront (existing theme.liquid installs are migrated) | Clarity’s docs say checkout and post-checkout pages are tracked through Shopify’s pixel for Shopify Plus stores. Its July 2025 announcement mentions checkout funnel analysis and heatmaps and recordings for post-purchase pages |
In practice:
- Storefront heatmaps and recordings: install through the theme or the vendor’s own Shopify app, not a custom pixel.
- Checkout: unless the vendor documents checkout coverage through its own Shopify integration (Clarity does, for Shopify Plus), plan on no heatmaps there. Read behavior inside checkout from standard events such as checkout_started and payment_info_submitted in your analytics tool instead.
Inside custom pixel code, you can use analytics (event subscriptions), browser (cookies and storage), and init (the page, cart, and consent state at load time) directly. To receive consent changes, use api.customerPrivacy.
Custom pixel or app pixel: which to use
If an app covers what you need, use its app pixel. Shopify’s help center recommends choosing an app pixel integrated with the third-party service for higher security and automatic updates, and using a custom pixel only when no app pixel meets your requirements.
| What you want | Best fit |
|---|---|
| Basic GA4 and Google Ads tracking | The Google & YouTube app. See how to connect Shopify to GA4 |
| Meta ads tracking | The Facebook & Instagram app |
| A tracking tool with no official app | Custom pixel |
| Managing several tags in Google Tag Manager | GTM inside a custom pixel |
| Custom events or parameters beyond the standard events | Custom pixel (published from the theme) |
| Heatmaps and session recordings (Hotjar, Microsoft Clarity) | Theme code or the vendor’s Shopify app. Checkout coverage depends on the vendor |
Our view is that a custom pixel fills gaps the apps leave. A store that sends GA4 purchases through the Google & YouTube app and also sends them from a custom pixel will double-count. Before adding a custom pixel, list which routes currently send what. It makes checking everything later much easier.
Shopify’s help center also includes a Meta pixel example for custom pixels (fbq('init', ...), then fbq('track', 'Purchase', ...) on checkout_completed). But if the store also runs the Facebook & Instagram app, the same purchase arrives twice. If you also send the Conversions API from a server, browser and server events need the same event ID so Meta can deduplicate them.
How to add a custom pixel
In the admin, go to Settings > Customer events, name the pixel, paste the code, save, and then connect it to start tracking.
- First, remove old code that tracks the same things. Leaving it in place double-counts. Check:
- Online Store > Themes: open the theme’s ”…” menu, choose Edit code, and search theme.liquid and other files for
gtag(,GTM-, andfbq(. - Additional scripts in your checkout settings (now read-only, so anything left there doesn’t run on upgraded pages). Plus stores should also check checkout.liquid.
- Apps: whether an app such as Google & YouTube or Facebook & Instagram already tracks the same thing.
- Online Store > Themes: open the theme’s ”…” menu, choose Edit code, and search theme.liquid and other files for
- In the admin, open Settings > Customer events.
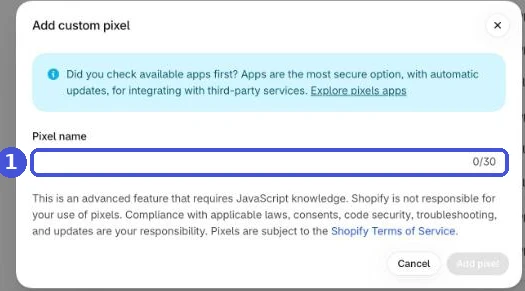
- Click Add custom pixel in the top-right and enter a pixel name. It can’t match another custom pixel’s name.
- Click Add pixel to open the event editor.
- If needed, set Permission and Data sale under Customer privacy (covered in the consent section below).
- Paste your JavaScript into the Code window. Remove HTML tags such as
<script>. - Click Save. To start tracking now, click Connect pixel.
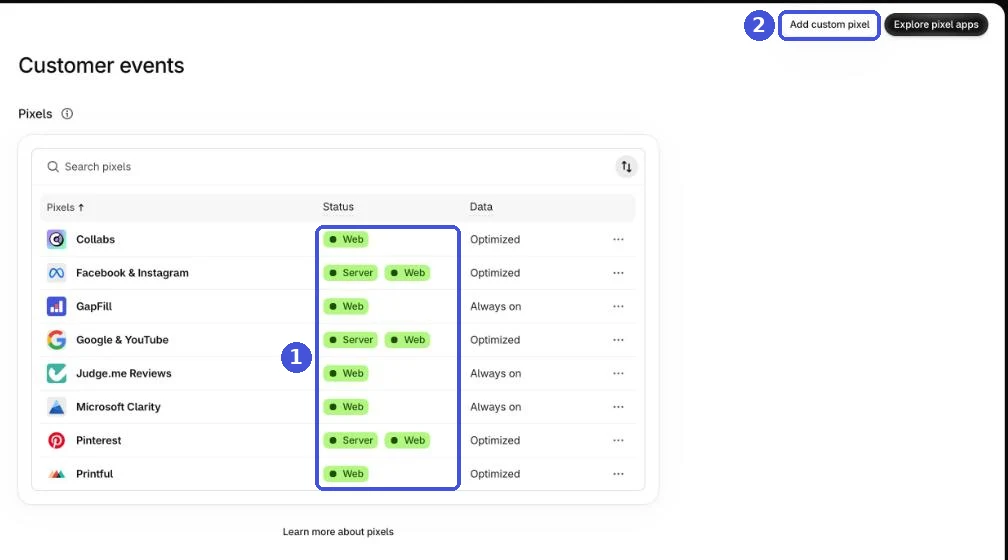
To connect later, open the Custom pixels tab in Customer events, find the pixel under Disconnected pixels, and click Connect. To stop it, click Disconnect; the pixel isn’t deleted. To delete it, use the row’s ”…” menu, but deletion can’t be undone.
Test with Shopify Pixel Helper
After saving, click Test on the pixel’s page to open Shopify Pixel Helper on your storefront. As you use the store, received events appear in a list. A green dot means the event was subscribed to and the callback ran successfully; a red dot means the callback failed (expand the event to see the error).
You can test only one custom pixel at a time, and you can’t edit it while testing (save your changes, then close and reopen the Pixel Helper tab). Event logs clear when you move to another page. If you see “Pixel is awaiting consent,” accept tracking in your cookie banner or click “Give consent to continue test.” Pixel Helper doesn’t work on headless stores, and on a password-protected store, Shopify suggests turning off the password page first. Google Tag Assistant is limited here; see Google Tag Assistant for what it can and can’t show.
To test the purchase event, place a test order. If you use Shopify Payments, go to Settings > Payments, click Manage in the Shopify Payments section, select Enable test mode, and click Save. Orders placed this way aren’t charged. In our tests, pixels still fired on test orders, so they reached GA4 as purchases too. After checking them in DebugView, decide how you’ll handle test purchases mixed into production data. To see which data each event carries, temporarily add this code and watch the browser console:
analytics.subscribe("all_standard_events", (event) => {
  console.log(event.name, event.data);
});
Shopify standard events and GA4 events
Shopify’s standard events need to be mapped to GA4 recommended events: checkout_completed to purchase, product_added_to_cart to add_to_cart, and so on. Without renaming the events and parameters, they won’t appear in GA4’s ecommerce reports. GA4 events covers GA4 event types and ecommerce parameters in full.
| Shopify standard event | When it fires | GA4 recommended event |
|---|---|---|
| page_viewed | A page is viewed | page_view |
| collection_viewed | A collection page is viewed | view_item_list |
| search_submitted | A store search is submitted | search |
| product_viewed | A product page is viewed | view_item |
| product_added_to_cart | An item is added to the cart | add_to_cart |
| product_removed_from_cart | An item is removed from the cart | remove_from_cart |
| cart_viewed | The cart page is viewed | view_cart |
| checkout_started | Checkout starts | begin_checkout |
| checkout_contact_info_submitted | Contact information is submitted | (no equivalent) |
| checkout_address_info_submitted | The address is submitted | add_shipping_info |
| checkout_shipping_info_submitted | A shipping method is chosen | (sometimes mapped to add_shipping_info) |
| payment_info_submitted | Payment information is submitted | add_payment_info |
| checkout_completed | Checkout is completed | purchase |
| alert_displayed / ui_extension_errored | An alert is shown, an extension errors | (no equivalent) |
Shopify’s GTM tutorial maps add_shipping_info to the address step (checkout_address_info_submitted). GA4’s add_shipping_info can carry the shipping method (shipping_tier), so if you want to analyze shipping methods, mapping it to the shipping method step (checkout_shipping_info_submitted) fits better. Pick one and don’t send it from both.
Besides standard events, there are DOM events for clicks and form submissions (clicked, form_submitted, and others). They work on the storefront, checkout, and Thank you page, but not on the Order status page.
Parameters for purchase
Take the purchase parameters from checkout_completed’s event.data.checkout. Based on Shopify’s mapping:
| GA4 parameter | checkout_completed value |
|---|---|
| transaction_id | checkout.order.id |
| value | checkout.totalPrice.amount |
| currency | checkout.currencyCode |
| tax | checkout.totalTax.amount |
| shipping | checkout.shippingLine.price.amount |
| coupon | The discount code, pulled from the checkout’s discount data (checkout.discountApplications) |
| items | checkout.lineItems (reshaped into GA4’s items format) |
Four things to align:
- Match the transaction ID format.
checkout.orderholds the order ID and buyer details, not the order number shown in the admin (such as #1001). If another tag sends order numbers to the same GA4 property (the Google & YouTube app, for example), sending order IDs here makes the two impossible to match. Check the actual values in Pixel Helper and match the other route’s format. - Match item_id with other routes. The example code uses SKU, but if another route sending to the same property uses a different format, the same product shows up as separate items in GA4’s product reports.
- Decide what value means. Shopify’s developer docs describe
totalPriceas the sum of all item prices “including duties, taxes, and discounts,” andsubtotalPriceas the price “before duties, shipping, and taxes.” They don’t say whethertotalPriceincludes shipping, so compare a test order with the admin total and match whatever your other routes use. - The order ID exists only on checkout_completed. Per the developer docs,
order.idis null on every other event.
checkout_completed fires once per checkout, typically on the Thank you page. If you have post-purchase upsells, it fires on the first upsell page instead and doesn’t fire again on the Thank you page. And if that page fails to load, it isn’t triggered at all. This matters in the “purchases a pixel can’t capture” section below. Standard events don’t include refunds either; send refunds to GA4 from a server, not a pixel.
How to set up Google Tag Manager in a Shopify custom pixel (with code)
First, here’s how purchase data reaches GA4.
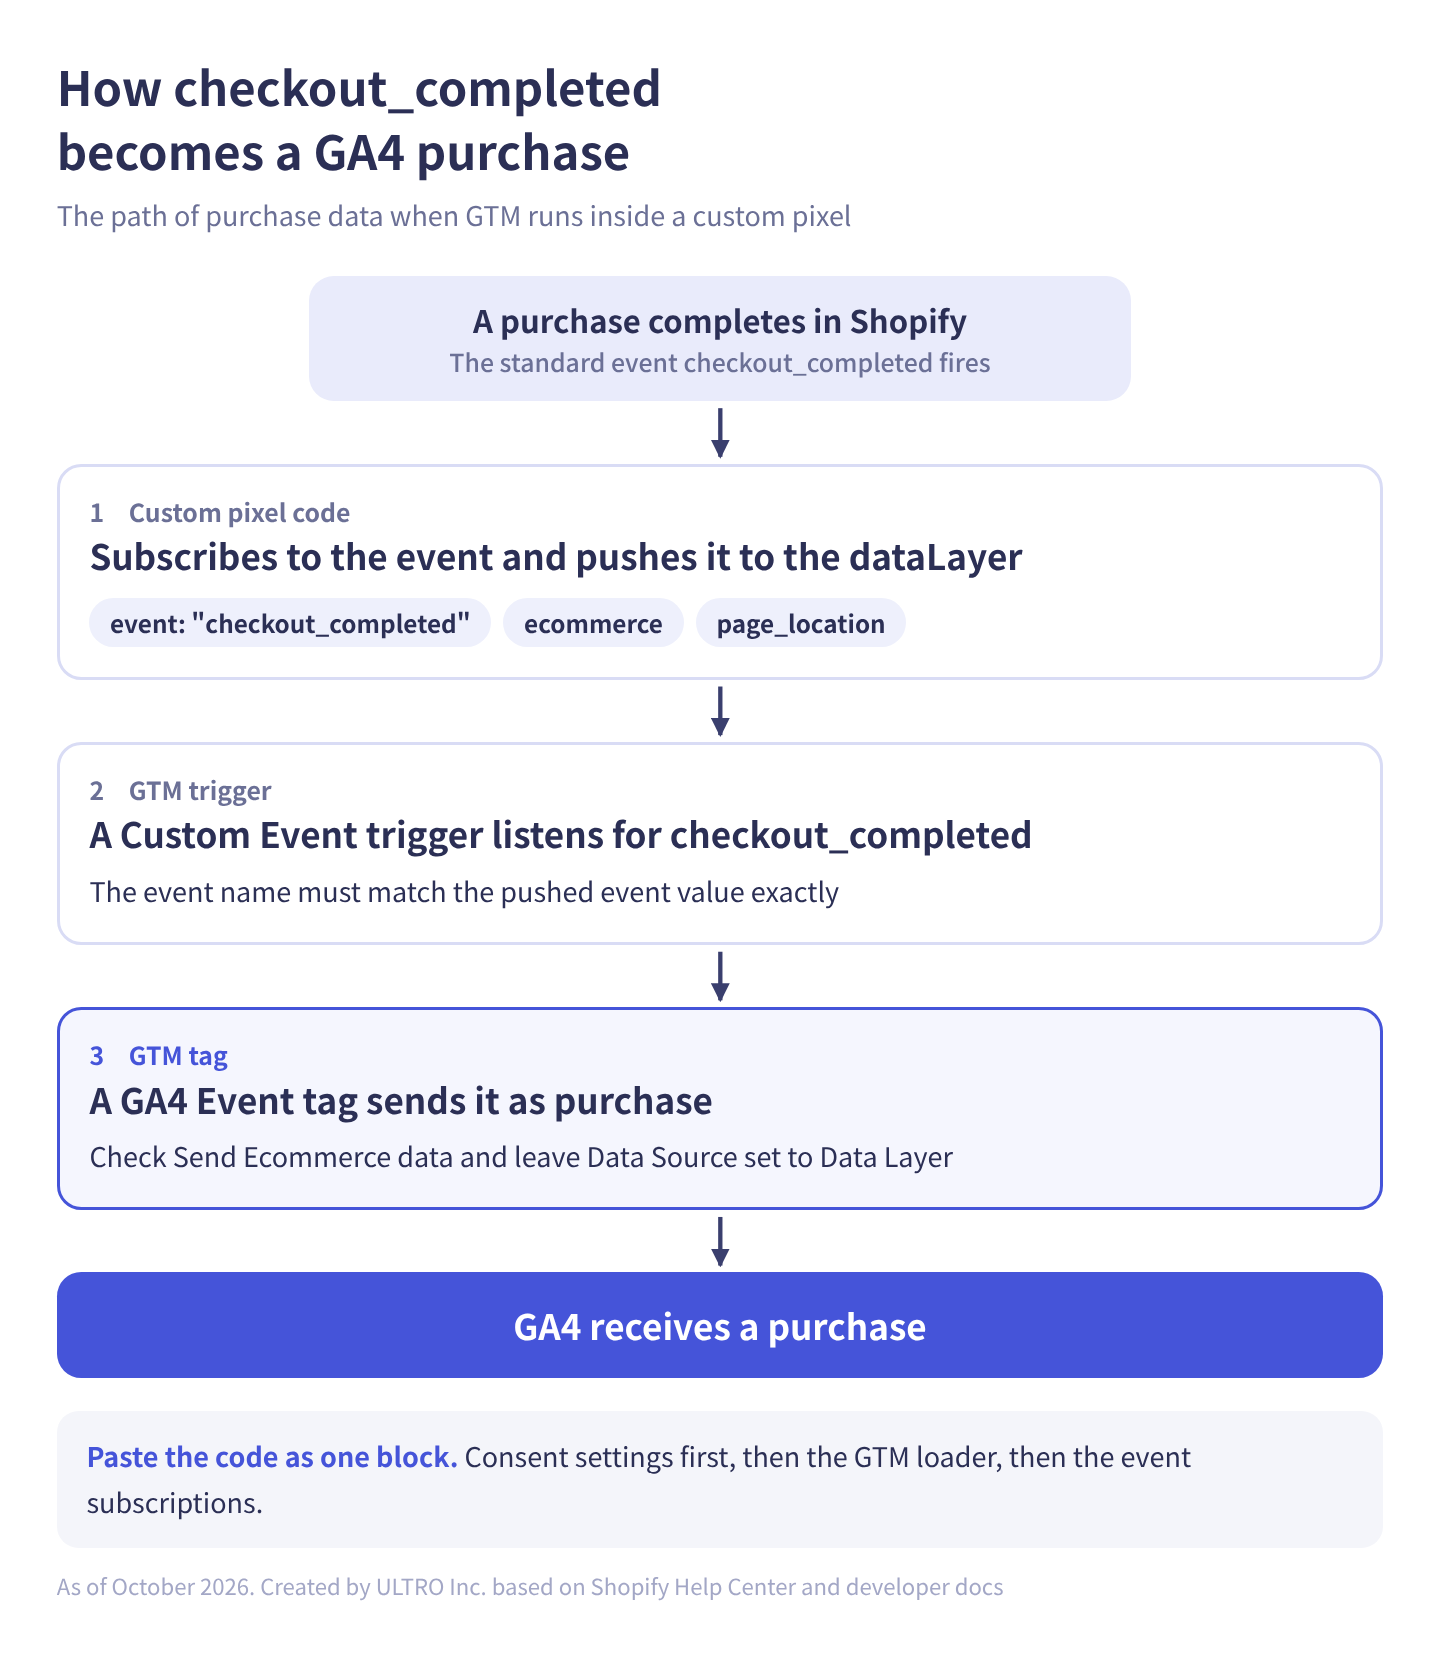
To use GTM, paste its install code into a custom pixel, subscribe to customer events, and push them to the dataLayer. The steps:
- In GTM, click Admin, then Install Google Tag Manager, and copy the code for the head.
- Remove
<script>and</script>and paste it into the custom pixel’s Code window. - Add code that subscribes to standard events and pushes them to the dataLayer.
- In GTM, create the triggers and GA4 event tags (see the minimal setup below).
Paste the code as one block in this order: consent settings, the GTM loader, then event subscriptions. The consent code must come before GTM loads. Replace the container ID with your own.
window.dataLayer = window.dataLayer || [];
function gtag(){dataLayer.push(arguments);}

// 1. Pass the consent state to Google consent mode (before GTM loads)
const toConsent = (p) => ({
  analytics_storage: p.analyticsProcessingAllowed ? "granted" : "denied",
  ad_storage: p.marketingAllowed ? "granted" : "denied",
  ad_user_data: p.marketingAllowed ? "granted" : "denied",
  ad_personalization: p.marketingAllowed ? "granted" : "denied",
});
gtag("consent", "default", toConsent(init.customerPrivacy));
api.customerPrivacy.subscribe("visitorConsentCollected", (event) => {
  gtag("consent", "update", toConsent(event.customerPrivacy));
});

// 2. Load GTM (the install code without its script tags)
(function(w,d,s,l,i){w[l]=w[l]||[];w[l].push({'gtm.start':
new Date().getTime(),event:'gtm.js'});var f=d.getElementsByTagName(s)[0],
j=d.createElement(s),dl=l!='dataLayer'?'&l='+l:'';j.async=true;j.src=
'https://www.googletagmanager.com/gtm.js?id='+i+dl;f.parentNode.insertBefore(j,f);
})(window,document,'script','dataLayer','GTM-XXXXXXX');

// 3. Subscribe to events
analytics.subscribe("page_viewed", (event) => {
  window.dataLayer.push({
    event: "page_viewed",
    page_location: event.context.window.location.href,
    page_referrer: event.context.document.referrer,
    page_title: event.context.document.title,
  });
});

analytics.subscribe("checkout_completed", (event) => {
  const c = event.data.checkout;
  window.dataLayer.push({ ecommerce: null });
  window.dataLayer.push({
    event: "checkout_completed",
    page_location: event.context.window.location.href,
    ecommerce: {
      transaction_id: c.order?.id,
      value: c.totalPrice?.amount,
      currency: c.currencyCode,
      tax: c.totalTax?.amount,
      shipping: c.shippingLine?.price?.amount,
      items: c.lineItems.map((l) => ({
        item_id: l.variant?.sku || l.variant?.id,
        item_name: l.title,
        item_variant: l.variant?.title,
        price: l.variant?.price?.amount,
        quantity: l.quantity,
      })),
    },
  });
});
Shopify’s GTM example sets every consent mode value to granted, and notes that this might not match what your region’s privacy laws require. Pasted as is, it tells Google “consent granted” regardless of what the visitor chose, so build the values from the actual consent state as above (more in the consent section).
On the GTM side, this minimal setup receives purchase:
- Trigger: type Custom Event, event name
checkout_completed(it must match the pushedeventvalue exactly). - Tag: tag type Google Analytics: GA4 Event, event name
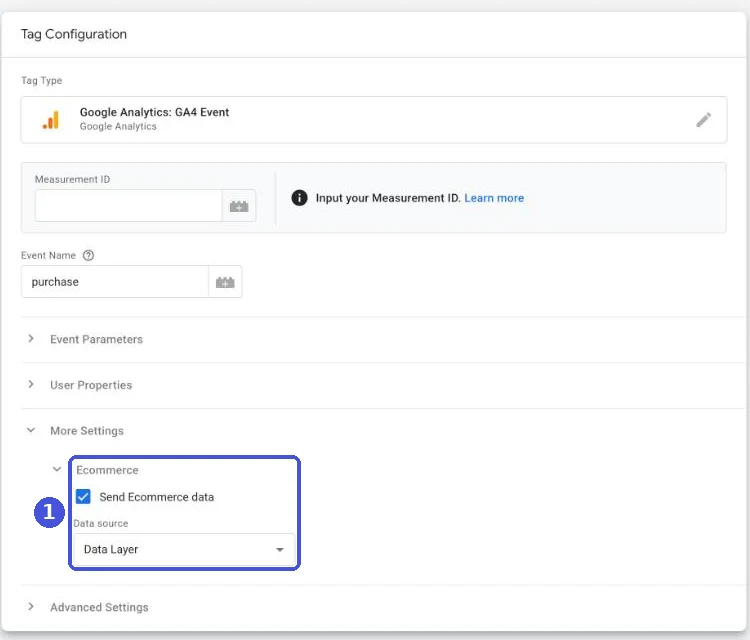
purchase. Under More Settings > Ecommerce, check Send Ecommerce data and leave Data Source set to Data Layer. - page_location: add a Data Layer Variable for
page_locationand pass it as a parameter on the GA4 tag.
Where GTM in a custom pixel trips people up
The common sticking points are testing, page URLs, events that are no longer collected automatically, double counting, and confusing client IDs.
| Sticking point | What happens | What to do |
|---|---|---|
| Preview mode and Tag Assistant | Shopify’s help center says Tag Assistant’s Troubleshoot tag feature doesn’t detect Google tags in a custom pixel or tags loaded by GTM there. Many people also report that GTM Preview mode doesn’t work well | Check events in Pixel Helper, payloads in GA4’s Realtime report and DebugView, and requests in the browser’s Network tab (filter on collect?v=2) |
| Page URL (page_location) | The URL GA4 collects automatically includes sandbox details | Turn off GA4’s automatic page views and pass the page_location from page_viewed to your page_view tag. Pass event.context.document.referrer as page_referrer too, so it matches the store page |
| Enhanced measurement | Events based on page elements, such as outbound clicks and scrolls, aren’t collected automatically | Publish only the ones you need from the theme with Shopify.analytics.publish(). Turn off the enhanced measurement events you won’t use |
| Double counting | The same event arrives from the Google & YouTube app or a theme Google tag and from the custom pixel | Send through one route only |
| Client ID mix-ups | event.clientId is Shopify’s own ID, not GA4’s client ID | When you need GA4’s ID, read the _ga cookie (see below) |
page_location matters for more than page reports: GA4 reads UTM parameters and gclid from the URL to determine the source. Attach the same page_location to purchase and your other event tags so the page doesn’t drift between events. If (not set) rises after a change, (not set) in Google Analytics 4 explains how to tell the causes apart.
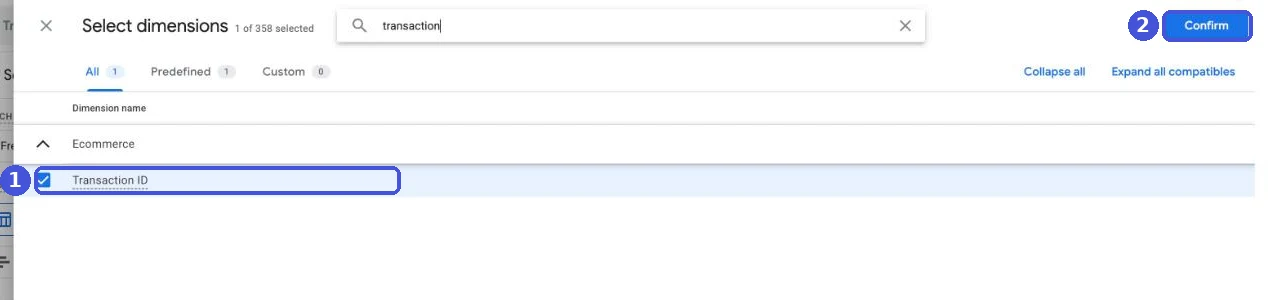
Double counting is the most common problem after adding a custom pixel. A basic check is whether each action is recorded exactly once. The quickest way: in a GA4 exploration, look for transaction IDs with 2 or more transactions. Choose the “Transaction ID” dimension and put it next to the “Transactions” metric. GA4 duplicate purchases walks through it step by step.
Custom pixels and consent (Customer Privacy API and Permission settings)
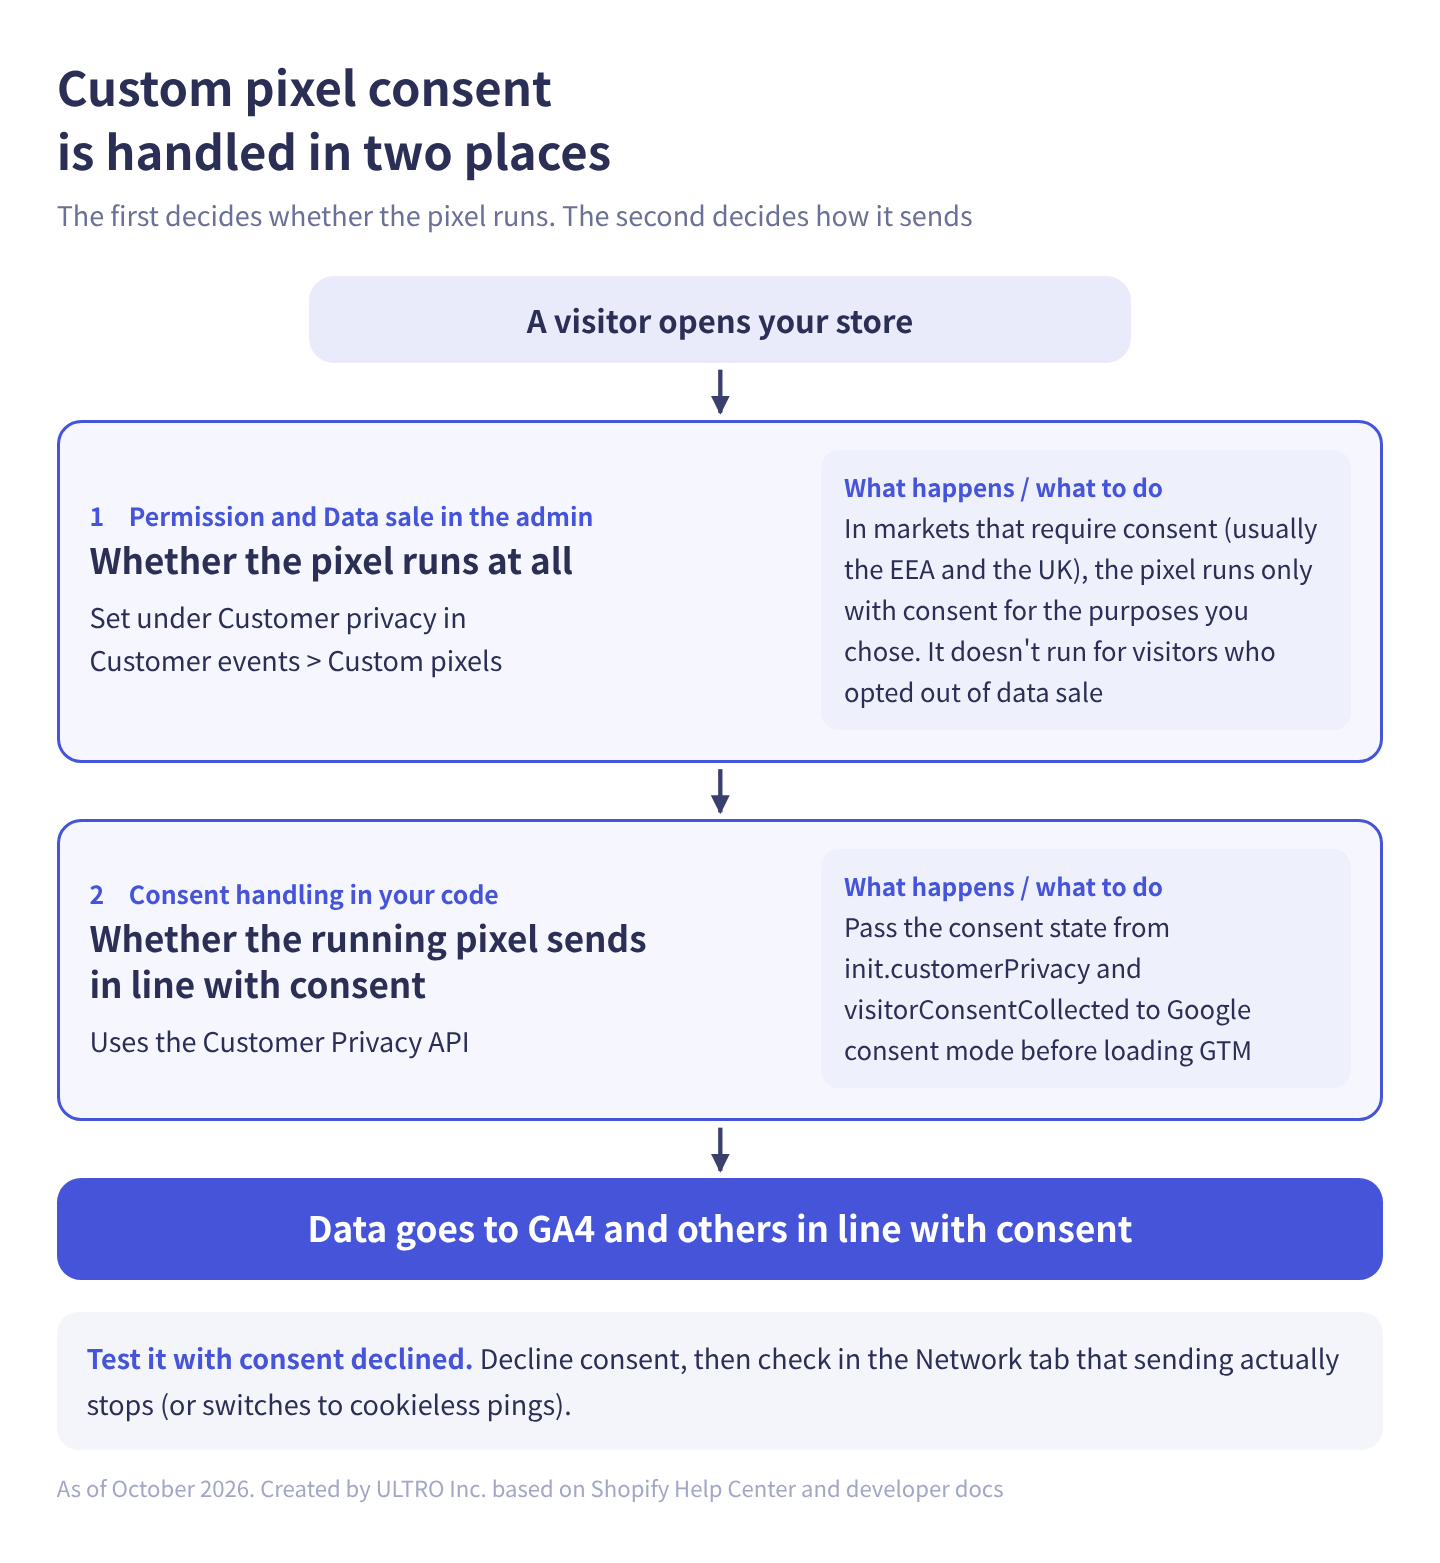
Consent for a custom pixel is handled in two places: the Permission settings in the admin, and code that passes the consent state to Google and others. The first decides whether the pixel runs; the second decides whether a running pixel sends data in line with consent.
Pixel Permission settings
Open a pixel under Customer events > Custom pixels, and Customer privacy has two settings:
| Setting | Options | Default | Effect |
|---|---|---|---|
| Permission | Required (choose purposes) / Not required | Marketing and Analytics required | In markets that require consent, the pixel runs only with consent for the chosen purposes |
| Data sale | Whether the pixel’s data collection qualifies as data sale | Qualifies as data sale | The pixel doesn’t run for visitors who opted out of data sale |
Markets that require consent are usually the EEA and the UK. Unless you’ve set a market to require consent, visitors in that market are tracked without a banner. The Data sale setting is what matters for US visitors who opt out of the sale or sharing of their data under state privacy laws.
If you set Permission to Not required, the pixel runs before consent even in markets that require it. In that case, you have to handle consent in your code with the Customer Privacy API below.
Pass consent to Google with the Customer Privacy API
Inside a custom pixel, init.customerPrivacy gives the consent state at load, and api.customerPrivacy.subscribe with visitorConsentCollected gives you changes made in the banner. There are four values: analyticsProcessingAllowed, marketingAllowed, preferencesProcessingAllowed, and saleOfDataAllowed. Step 1 in the GTM code above maps these to Google consent mode and passes them before GTM loads.
If your store accepts data sale and sharing opt-outs under US state laws, you can also grant ad_user_data and ad_personalization only when marketingAllowed && saleOfDataAllowed.
Shopify’s help center says the Marketing and Analytics purposes map to Google’s consent mode, but it’s up to you to check each service’s documentation for which purpose maps to which value, so treat the code above as one example. After setting it up, decline consent and check in the Network tab that sending actually stops (or switches to cookieless pings). Treat “the banner appears” and “declining actually changes what’s sent” as two separate checks.
Capture the GA4 client ID and session ID in a custom pixel
If a custom pixel captures the GA4 client ID and session ID, you can later send purchases that never reached GA4 with the Measurement Protocol, joined to the original visit. A purchase sent without those IDs shows up in GA4 as a new user’s purchase with no visit and no source.
GA4’s IDs live in two cookies on the store’s domain. A custom pixel can read the top frame’s cookies with browser.cookie.get().
| Cookie | Contains | Example value |
|---|---|---|
_ga | Client ID | GA1.1.123456789.1700000000 (the last two numbers are the client ID) |
_ga_ + your measurement ID without “G-” | Session ID | The value includes the session start timestamp |
Per Google’s Measurement Protocol changelog, since February 17, 2026 the Measurement Protocol accepts a client ID cookie for client_id and a session ID cookie for session_id. Google still recommends sending non-cookie values. See the GA4 Measurement Protocol guide for how to send them.
Here’s one way to capture them: when checkout completes, send them to your own server along with the order ID.
const MEASUREMENT_ID_SUFFIX = "XXXXXXXXXX"; // the part after G- in G-XXXXXXXXXX

let privacy = init.customerPrivacy;
api.customerPrivacy.subscribe("visitorConsentCollected", (e) => {
  privacy = e.customerPrivacy; // update if consent is given later on the same page
});

analytics.subscribe("checkout_completed", async (event) => {
  if (!privacy.analyticsProcessingAllowed) return; // no analytics consent, don't capture

  const gaCookie = await browser.cookie.get("_ga");
  const gaSessionCookie = await browser.cookie.get("_ga_" + MEASUREMENT_ID_SUFFIX);

  fetch("https://example.com/ga-ids", {
    method: "POST",
    keepalive: true,
    body: JSON.stringify({
      order_id: event.data.checkout.order?.id,
      checkout_token: event.data.checkout.token,
      ga_cookie: gaCookie,
      ga_session_cookie: gaSessionCookie,
    }),
  });
});
Things to watch when you build this:
- Is
_gaon the store’s domain? If you run the Google & YouTube app or a Google tag in the theme, GA4 runs on the store’s pages and_gais stored on the store’s domain. If neither is present and GTM runs only inside the custom pixel, GA4 runs only inside the pixel. Either way, open your browser’s developer tools and check that the cookie actually has a value before relying on it. - Capture before checkout completes, too. Purchases missing from GA4 include those where the Thank you page never loaded, and then code that captures on checkout_completed never runs. You can capture at checkout_started or payment_info_submitted keyed on the checkout token (
checkout.token), then match it with the order once it’s placed. - Make the endpoint accept CORS. Requests come from the sandbox, so your server has to allow cross-origin POSTs.
- Send IDs only. Don’t send email addresses, addresses, or other buyer details.
- Respect consent. Don’t capture IDs for visitors without analytics consent, and don’t send their purchases later.
We turned this whole flow, from capturing to sending, into a Shopify app, GapFill. It’s our own product, so read with that in mind. Its app pixel captures the client ID and session ID at checkout automatically, and it recovers missing GA4 purchase events server-side. It works alongside your existing tags, so there’s no custom pixel to write, and the missing purchases report is free.
Our Shopify appGapFill: Recover missing GA4 purchase events server-sideWorks alongside your existing tags. Free missing purchases report.See GapFill →Purchases a custom pixel can’t capture
A custom pixel only runs when a Shopify page opens in the buyer’s browser. Purchases that never reach the Thank you page, or that never touch the store at all, can’t be captured no matter how you change the code.
| Type of purchase | Captured by a pixel? | Why |
|---|---|---|
| Buyer reaches the Thank you page normally | Yes | checkout_completed fires |
| Buyer doesn’t return from an off-site payment provider | No | The Thank you page never opens |
| Buyer closes the Thank you page while it loads | No | The event doesn’t fire unless the page loads |
| Sending is blocked by an ad blocker or browser tracking prevention | The pixel may run, but the request to GA4 can be blocked | Requests to the destination are blocked |
| Checkout completed inside an AI assistant or social app | No | No store page that loads pixels opens in the buyer’s browser |
| Subscription renewals | No | The order is created automatically and the buyer never visits |
In one of our clients’ Shopify stores (GA4 connected through the Google & YouTube app), we matched orders against GA4 purchases one by one from August to mid-September 2026, and 21% of orders were missing from GA4. Even with an app integration, purchases a tag can’t capture remain. The only way to know how many your store has is to match your own orders against GA4.
Those purchases have to be sent from the server, starting from Shopify order data, not from a pixel. Server-side GTM still needs the first event to happen in a browser, so it can’t recover purchases where no pixel ran. GA4 Not Tracking All Shopify Purchases? compares the ways to fill that gap.
Custom pixel not working? What to check
When a custom pixel doesn’t work, check in this order: is the pixel running, is it receiving events, and is the data reaching the destination?
- Is it connected? Check the Status column in the pixel list under Customer events. Saving alone doesn’t start it; it has to be connected.
- Is it waiting for consent? Look for “Pixel is awaiting consent” in Pixel Helper, and check the Permission and Data sale settings and the per-market settings under Settings > Customer privacy.
- Code errors: a red dot in Pixel Helper means that event’s callback threw an error. An error at the top level of the code (outside a subscription) can leave the pixel only partly working.
- Event and trigger names: make sure the GTM trigger’s event name matches the
eventyou pushed to the dataLayer. - Is it reaching GA4? Check event names and parameters (transaction_id, value, currency, items) in GA4’s Realtime report or DebugView. Check for duplicates here too.
Sources
- Pixels and customer events (Shopify Help Center)
- Pixels overview (Shopify Help Center)
- Custom pixels (Shopify Help Center)
- Creating custom pixel code (Shopify Help Center)
- Managing custom pixels (Shopify Help Center)
- Create a Google Tag Manager custom pixel (Shopify Help Center)
- Testing custom pixels (Shopify Help Center)
- Shopify Payments test mode (Shopify Help Center)
- Web Pixels API (Shopify.dev)
- About web pixels (Shopify.dev)
- Standard Events (Shopify.dev)
- checkout_completed (Shopify.dev)
- DOM Pixel Events API (Shopify.dev)
- Pixel Privacy (Shopify.dev)
- browser (Shopify.dev)
- Shopify (Hotjar Help Center)
- Shopify integration (Microsoft Clarity documentation)
- Optimize Every Step of the Ecommerce Funnel with Clarity for Shopify (Microsoft Clarity blog, July 2025)
- Measure ecommerce (Google for Developers)
- Measurement Protocol changelog (Google for Developers)
FAQ
What is a Shopify custom pixel?
It's JavaScript you register under Settings > Customer events in the Shopify admin to send store activity to outside tracking tools. It runs on checkout and the Thank you page without editing your theme code. Pixels installed by apps are app pixels; pixels you add by hand are custom pixels.
What's the difference between a custom pixel and an app pixel?
How they're installed and where they run. An app pixel comes with an app and runs in a stricter sandbox. A custom pixel is code you paste into the admin; it runs in a looser sandbox where ordinary JavaScript tags work more easily, but you maintain it yourself. Shopify recommends an app pixel when one meets your needs, for higher security and automatic updates.
Can I use Google Tag Manager in a Shopify custom pixel? Does Preview mode work?
Yes. Paste the GTM install code without its HTML tags, then add code that subscribes to customer events and pushes them to the dataLayer. Because GTM also runs inside the sandbox, Shopify's help center says Google Tag Assistant's Troubleshoot tag feature doesn't detect tags in a custom pixel. Test with Shopify Pixel Helper and GA4's Realtime report and DebugView instead.
Why isn't my custom pixel firing?
The usual reasons: it was saved but never connected, it's waiting for consent in a market that requires it, it's blocked for visitors who opted out of data sale, there's an error in the code, or the GTM trigger's event name doesn't match. Check in Shopify Pixel Helper first whether events arrive and whether any show errors.
Can I run Hotjar or Microsoft Clarity in a custom pixel?
Not usefully. A custom pixel runs in an iframe and can't read the page's elements, clicks, or scrolling, which is what heatmaps and session recordings need. Hotjar's help center says to install its code in theme.liquid and that it covers the storefront only. Microsoft Clarity's Shopify app adds Clarity to the storefront, and Clarity says checkout and post-checkout pages are tracked through Shopify's pixel for Shopify Plus stores.
Why doesn't checkout_completed fire for some purchases?
It fires only when the Thank you page (or the first upsell page, if you have one) loads. It doesn't fire for buyers who don't return from an off-site payment provider, buyers who close the page while it loads, checkouts completed inside AI assistants or social apps, or subscription renewals. Those have to be sent from order data with the Measurement Protocol.
Does a custom pixel run without a cookie banner?
In markets set to require consent (usually the EEA and the UK), it runs only when the visitor has given the consent its Permission setting requires. In markets that don't require consent, it runs without a banner. New custom pixels qualify as data sale by default, though, so they don't run for visitors who opted out of data sale.
- A custom pixel is tracking JavaScript added under Settings > Customer events. It runs on checkout and the Thank you page too.
- It runs in a lax iframe sandbox, so it can't read the page. Page URLs include sandbox details, so use the page_viewed event's values.
- To send to GA4, map Shopify standard events to GA4 recommended events. Purchase is checkout_completed to purchase.
- Google Tag Assistant can't see tags in a custom pixel. Test with Shopify Pixel Helper and GA4's Realtime report and DebugView.
- Heatmap tools such as Hotjar and Microsoft Clarity go in the theme or the vendor's Shopify app, not in a custom pixel.
- Handle consent in two places: the pixel's Permission settings, and code that passes Customer Privacy API values to Google consent mode.
- Capturing the GA4 client ID and session ID lets you send missing purchases with the Measurement Protocol, joined to the original visit. Purchases where no pixel ran can't be captured by the pixel itself.
Written byRyushi Nagata
CEO, ULTRO Inc. (Tokyo)Shopify Partner. Ryushi handles Shopify store builds, maintenance, advertising and CRM end to end, and has managed more than ¥4 billion in ad spend over his career. He holds Google Ads certifications (Search, Display, Video, Shopping, Apps, Performance Max, Measurement) and the Google Analytics certification.
How many purchases is GA4 missing in your store?
GapFill matches your Shopify orders against GA4 purchases, shows what GA4 missed, and recovers those purchase events server-side. It works alongside your existing tags, and the missing purchases report is free.