Shopify Google Analytics Setup: Connect GA4 and Check It Works

The three ways to connect GA4 to Shopify, step-by-step setup with the Google & YouTube app, the events it sends, what to check afterwards, why your numbers won't match Shopify's, and how to fix common problems.
Most people starting with Google Analytics 4 on Shopify get stuck on which way to connect it. The method Shopify points you to is its Google & YouTube app. But some merchants want to build things out in Google Tag Manager, and others pasted a tag into their theme years ago, so we often see stores with GA4 tags in several places at once.
This guide walks through the three ways to connect Shopify and GA4, how to connect with the Google & YouTube app, which events it sends automatically, and what to check once it’s connected. The second half covers why your numbers won’t match Shopify’s, what to watch out for with GTM, and common problems. Steps and specs follow Shopify’s and Google’s help documentation as of October 2026.
Three ways to connect Shopify and Google Analytics 4
There are three ways to add GA4 to Shopify: the Google & YouTube app, a custom pixel (GTM or similar), or pasting the tag into your theme code. Most stores should use the Google & YouTube app. Shopify recommends its built-in integration because it has the logic for recording ecommerce data built in, and warns that adding Google Analytics through GTM as well can result in duplicate tracking.
| Google & YouTube app | Custom pixel (GTM, etc.) | Pasted into theme code | |
|---|---|---|---|
| How to add it | Select your GA4 property in the app | Add code under Settings > Customer events in the Shopify admin | Paste the Google tag into theme.liquid |
| Ecommerce events | Sent automatically | You build them (from Shopify’s standard events) | You build them |
| Checkout and thank you page | Runs | Runs | Doesn’t run |
| Purchases | Tracked | Tracked | Not tracked |
| Consent banner | Follows Shopify’s settings | Follows the pixel’s Permission setting; you write Consent Mode yourself | Not connected automatically (you’d have to call the Customer Privacy API yourself) |
| Best for | Almost every store | Stores that want to manage custom events and multiple vendors’ tags themselves | Not recommended |
If you’re not sure, choose the Google & YouTube app and go on to “Before you connect.” Notes on GTM are in “Adding GA4 with GTM or your theme” further down.
Before you connect
Before connecting GA4 in the Google & YouTube app, have a GA4 property with a web data stream and a Google account with Editor access or higher on that property, and turn off password protection on your store. It also helps to take stock of the tags already installed, so you’re not chasing double counting later.
| What you need | Details |
|---|---|
| A GA4 property and web data stream | Create them in GA4 if you don’t have them. The web stream URL is your store’s domain |
| Google account access | Editor or higher on the property you connect. If you’ll connect Google Ads with the same account, admin access there helps too |
| Password protection off | Shopify’s help says Google Analytics can’t track events until you deactivate private mode for your online store |
| An inventory of existing tags | Look for GA4 tags in theme.liquid, checkout Additional scripts, custom pixels and other tracking apps |
A property is the container for one site’s data, and a web data stream is the entry point that receives data from that site. If you don’t use GA4 yet, create them in this order, following Google’s help:
- In GA4, open Admin, click Create, and choose Property. If this is your first time, start with Start measuring to create an account.
- Enter a property name and choose the reporting time zone and currency. Using the same time zone as your Shopify store makes daily numbers easier to compare.
- Under Data streams, add a Web stream, enter your store URL and a stream name, and click Create & continue.
How to connect GA4 with the Google & YouTube app
To connect GA4 with the Google & YouTube app, install the app, then pick your property in the Google Analytics section of the app’s Overview page and connect it. The button and section names below follow Google’s help.
- In the Shopify admin, search for “Google & YouTube,” and click Install on its Shopify App Store page. Review the permissions the app asks for and click Install again.
- Click Connect Google Account and choose a Google account with Editor access or higher on your GA4 property.
- On the app’s Overview page, find the “Just want to set up Google Analytics 4” section and click Get started.
- In the “Your Google Account” section, the GA4 properties that account can access are listed. Select the one you want, click Connect, then click Confirm.
- The Google tag (gtag.js) is now on your store. Open GA4’s Realtime report and check that your own visit appears.
You can also check the connection on the app’s Overview page, where Google Analytics shows as connected.
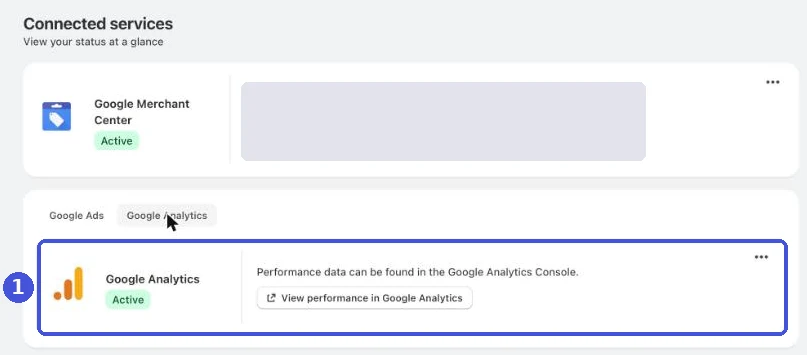
A Google tag is the code that sends data to GA4, and it identifies the destination property by a measurement ID that starts with “G-.” When you connect through the app, you never have to paste the measurement ID yourself.
You don’t need to connect Google Merchant Center just to use GA4, and you can skip connecting a Google Ads account and set up GA4 alone.
If you don’t have access, or want to send to more than one property
If you don’t have access to the property, or you want to send data to two or more properties, add the Google tag manually. Google’s help treats this as an alternative and strongly prefers connecting the property.
- Open the Google & YouTube app’s Settings page.
- In the Google tags section, click Manage.
- Add the Google tag for the GA4 property and click Save.
- Click Complete setup.
Events the Google & YouTube app sends to GA4
When you connect GA4 through the Google & YouTube app, recommended ecommerce events are sent to GA4 automatically, mapped from Shopify’s standard events. Google’s developer documentation, “Shopify event parameters,” lists these:
| GA4 event | Sent when | Shopify event |
|---|---|---|
| page_view | A page is viewed | page_viewed |
| view_item_list | A collection page is viewed | — |
| view_item | A product page is viewed | product_viewed |
| search | Someone searches the store | search_submitted |
| add_to_cart | A product is added to the cart | product_added_to_cart |
| remove_from_cart | A product is removed from the cart | — |
| view_cart | The cart page is viewed | — |
| begin_checkout | Checkout starts | checkout_started |
| add_shipping_info | Shipping or address details are entered at checkout | — |
| add_payment_info | Payment information is submitted | payment_info_submitted |
| purchase | A purchase is completed | checkout_completed |
A dash means the documentation doesn’t name the source Shopify event. Standard events such as session_start, first_visit and user_engagement are sent as well. Google’s help lists view_item_list, remove_from_cart, view_cart and add_shipping_info as newly collected events. add_shipping_info is only available in checkouts where Checkout Extensibility is enabled for customizations.
You usually don’t need to touch any of this. If you want to exclude specific events from reports, each event carries a shopify_event_name parameter you can filter on in GA4. To stop all GA4 data from the app, disconnect the Google Analytics integration in the app’s settings; purchase events stop too.
For how GA4 events are structured in general, see GA4 events explained.
Purchase value and transaction_id
Since April 24, 2025, the value the Google & YouTube app sends with purchase and begin_checkout (the basis for purchase revenue) accounts for both item-level and order-level discounts and excludes shipping and tax. If an event has no currency, GA4 treats it as USD. A US store won’t notice, but if you sell in another currency, check in DebugView that currency matches your store currency.
Purchases also carry a transaction_id that identifies the order. Google’s documentation doesn’t say which Shopify value goes into it, though. Shopify has two kinds of order identifiers, the order number (like #1001) and the long numeric order ID, and which one a tag sends depends on the route. After connecting, list transaction IDs in a GA4 exploration (the dimension is called Transaction ID) and check which one your store sends. You’ll need this to match orders or investigate double counting.
Ecommerce events only count as results for ads and channels once you mark purchase as a key event in GA4.
What to check after connecting GA4
After connecting Shopify and GA4, check that data arrives, that each purchase is recorded once, and that settings are in place to keep your data accurate. The baseline for any tracking setup is that tags fire on every page and each action is recorded exactly once. On Shopify, that comes down to seven checks (our own list).
| Priority | Check | Where | What to look for |
|---|---|---|---|
| Same day | Data is arriving | GA4 Realtime | Your own visit shows up within seconds to minutes |
| Same day | Test purchase | GA4 DebugView | purchase has transaction_id, value, currency and items |
| Same day | Data retention | Admin > Data collection and modification > Data retention | Change event data retention from 2 months to 14 months |
| Same day | Each purchase is counted once | GA4 Explore | Transaction ID doesn’t mix order numbers and order IDs, and no ID has 2 or more transactions |
| When you can | Internal traffic | Configure tag settings in your web stream details | Register office IP addresses under Define internal traffic and exclude them with a data filter |
| When you can | Payment gateway referrals | List unwanted referrals in Configure tag settings | Buyers returning from an off-site payment page aren’t credited to the gateway |
| If you use Google Ads | Purchase conversions | Google Ads conversion actions | Two purchase conversion actions aren’t both set to Primary |
Check Realtime and DebugView
To check the connection, open your store yourself and check that the visit appears in GA4’s Realtime report. Google’s help also points to the Realtime report for this.
To see what’s inside each event, use DebugView. Turn on debug mode with Google Tag Assistant, browse your store, then open DebugView from Admin > Data display. According to Google’s help, if you’ve implemented Consent Mode and the user hasn’t consented to analytics cookies, events don’t appear in DebugView. If your store shows a consent banner, accept it in your own browser before testing. How to connect Tag Assistant and read its screens is covered in How to use Google Tag Assistant.
To test purchases, buy an inexpensive product yourself and check that a purchase arrives in Realtime and DebugView. Afterwards, cancel and refund the order and note its order number so you can exclude it later. If you’ve activated a data filter that excludes internal IP addresses, purchases from that IP won’t show in reports, so make test purchases while the filter is still in Testing.
Check that each purchase is counted once
GA4 deduplicates purchases with the same transaction ID in web streams. So even if a purchase is sent twice, it usually collapses into one when the IDs match. Most double counting shows up instead as IDs in different formats side by side, such as #1001 and a long numeric order ID.
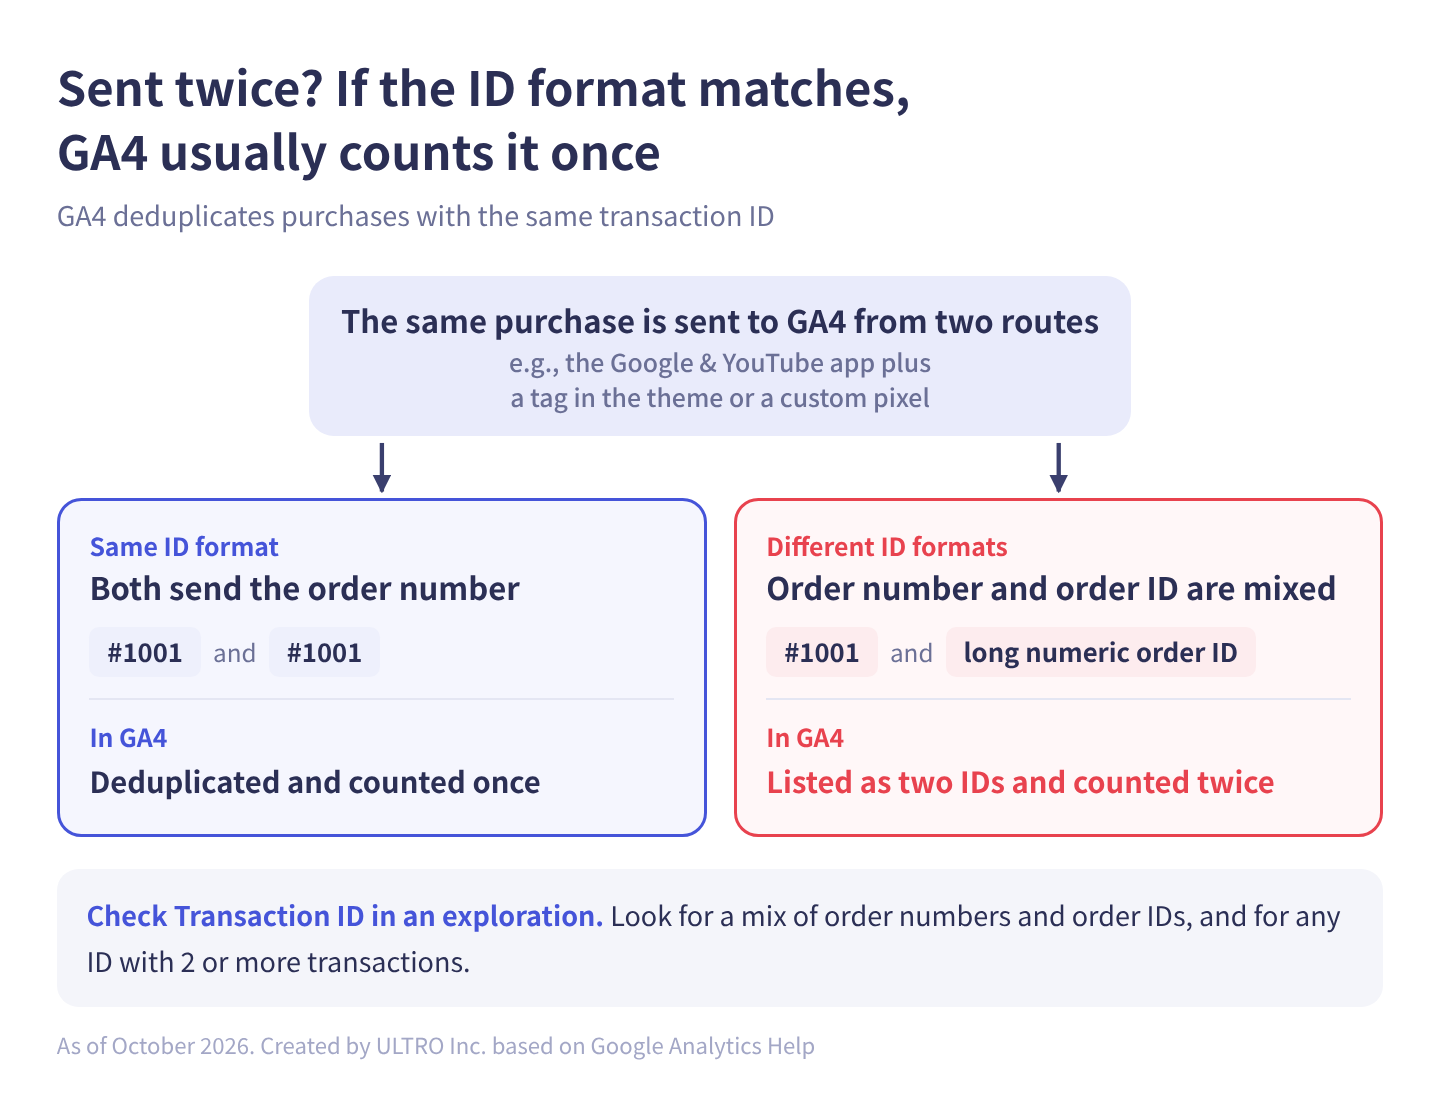
In GA4, go to Explore and start a Blank exploration (leave the technique as Free form). Add Transaction ID as a dimension and Transactions as a metric. In the selection dialog, check each one and confirm with the button at the top right.
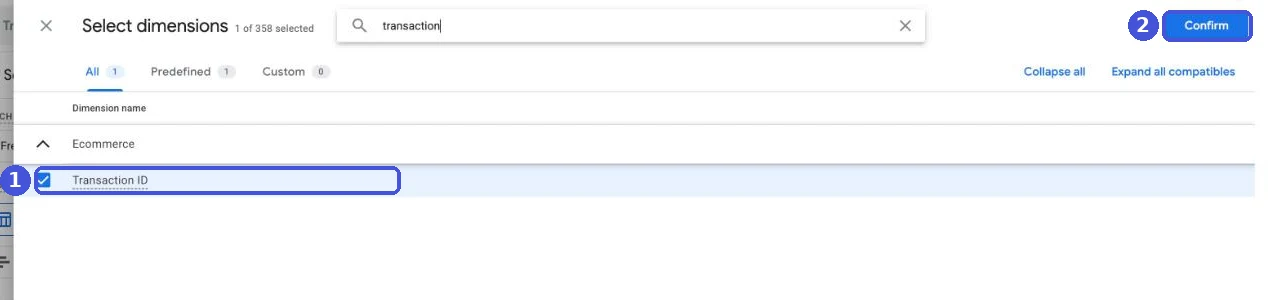
First sort by Transaction ID to see whether order numbers and order IDs are mixed. Then sort Transactions in descending order and look for any ID with 2 or more. How to investigate and fix it is covered in GA4 duplicate transactions.
Settings that keep your data accurate
If data retention stays at the default 2 months, you can’t compare with last year in explorations. Change event data retention to 14 months. Data that’s already been deleted doesn’t come back, so change it on the day you connect. Standard reports aren’t affected by this setting.
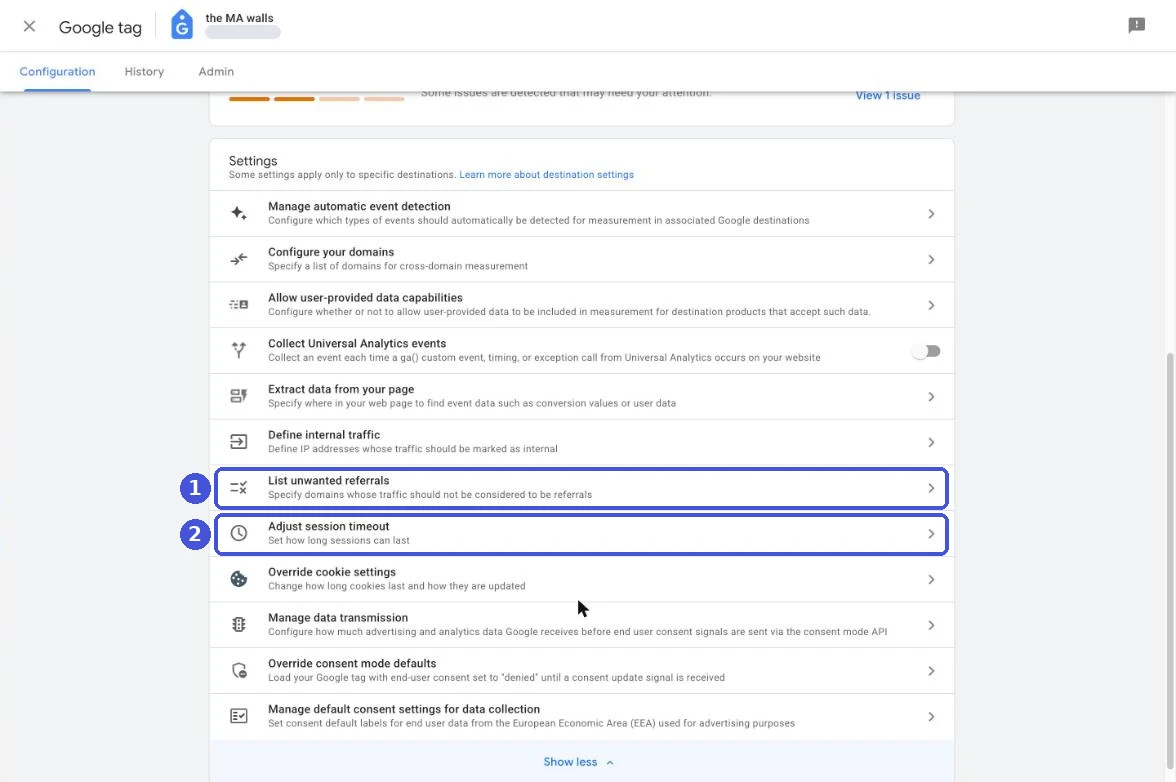
Internal visits and test purchases make your numbers look bigger than they are. Open Configure tag settings in your web stream details and expand the full Settings list to find Define internal traffic. Register your office IP addresses there and exclude them with a data filter, which removes matching data as it’s processed. Excluded data can’t be recovered, so start with the filter in Testing and switch it to Active once you’ve confirmed it behaves as expected.
If any payment method sends buyers to an off-site payment page (PayPal, for example), add that domain to List unwanted referrals in the same list. Otherwise purchases are credited as referrals from the payment provider, and your ads and search look like they’re producing less.
Why Shopify and GA4 numbers don’t match
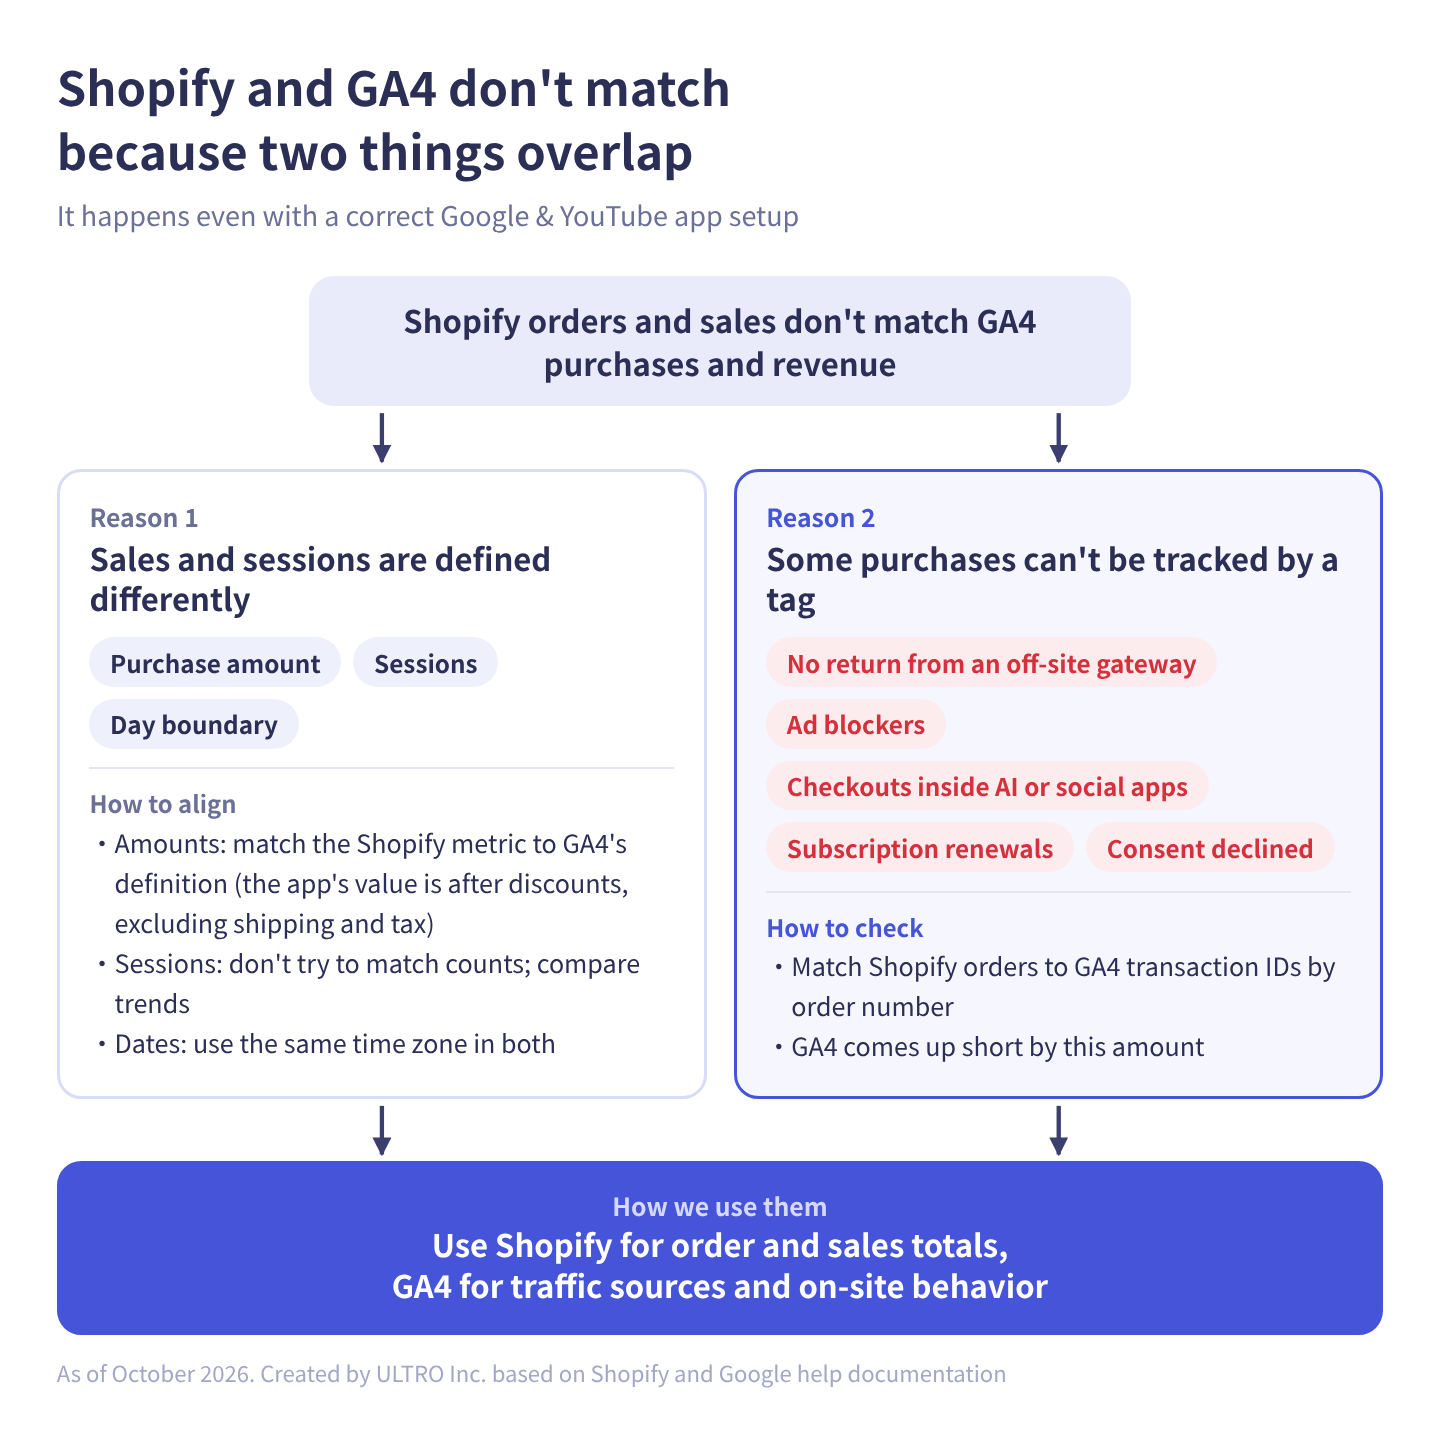
Shopify and GA4 numbers don’t match because two things overlap: sales and sessions are defined differently, and some purchases can’t be tracked by a tag at all. In our view, the practical approach is to use Shopify for order and sales totals, and GA4 for traffic sources and on-site behavior.
Different definitions
| Item | GA4 | Shopify | How to align |
|---|---|---|---|
| Purchase amount | The app’s value is after discounts, excluding shipping and tax | Each sales metric treats shipping, tax and returns differently | Match the Shopify metric to GA4’s definition |
| Sessions | Counted by GA4’s definition | Shopify Analytics’ own measurement, updated September 21–23, 2026 | Compare trends instead of trying to match counts |
| Day boundary | The property’s time zone | The store’s time zone | Use the same time zone in both |
| Purchase count | Only purchases where the tag ran | Every order | Match by order number |
When comparing Shopify data across the September 2026 session update, Shopify’s help asks you to treat it as a measurement change for sessions, conversion rate and other session-based metrics.
Purchases a tag can’t track
GA4 records a purchase when the tag runs in the buyer’s browser. Even with the Google & YouTube app, purchases like these may never reach GA4:
| Purchases likely to be missed | Why |
|---|---|
| Buyers who don’t return from an off-site payment gateway (PayPal, Klarna, etc.) | After paying, they close the tab instead of returning to the thank you page |
| Ad blockers and browser tracking protection | The tag is blocked from loading or sending |
| Checkouts completed inside AI assistants or social apps | No store page is ever opened |
| Subscription renewals | Orders are created automatically; the buyer never visits |
| Buyers who declined tracking in a consent banner | Correctly left out, since they declined |
In one client store connected through the Google & YouTube app, we matched Shopify orders against GA4 purchases one by one from August to mid-September 2026, and 21% of orders weren’t in GA4. How much was missing varied a lot by payment method. Even with the app set up correctly, purchases a tag can’t track remain. Orders placed inside AI assistants are covered in AI orders and GA4.
Start by checking how many are missing in your own store: export Shopify orders as CSV, export transaction IDs from a GA4 exploration, match them by order number, and pull out the orders missing from GA4. The full steps, including breaking them down by payment method, are in GA4 Not Tracking All Shopify Purchases?
To fill the gap, you can send orders to GA4 directly from your server, starting from the order data. Google’s mechanism for that is the Measurement Protocol. Server-side GTM, which resends browser events through your own server, differs in that it can’t recover purchases where no browser event ever happened.
We turned that approach into a Shopify app, GapFill. It’s our own product, so keep that in mind. It matches Shopify orders against GA4 purchases by transaction ID and recovers the missing GA4 purchase events server-side. It works alongside your existing tags, and the missing purchases report is free, so you can see how many orders and how much revenue are missing first.
Our Shopify appGapFill: Recover missing GA4 purchase events server-sideWorks alongside your existing tags. Free missing purchases report.See GapFill →Adding GA4 with GTM or your theme
If you add GA4 with GTM, put it in a custom pixel under Settings > Customer events in the Shopify admin, not in your theme, and don’t connect GA4 in the Google & YouTube app. If you connect both, the same purchase is sent from two routes.
Additional scripts and checkout.liquid no longer work
You can no longer put a GA4 purchase tag in the “Additional scripts” field in Shopify’s checkout settings, or in checkout.liquid on Shopify Plus. Both used to be the usual places. According to Shopify’s help, Additional scripts became read-only on August 28, 2025, and the deadline for non-Plus stores to upgrade their Thank you and Order status pages was August 26, 2026. Tracking on the new pages is meant to run through app pixels or custom pixels.
If your store used to add its purchase tag the old way, it may not be sending purchases anymore. If GA4 purchases dropped suddenly in late August, suspect this first.
Using GTM in a custom pixel
Custom pixels load on the storefront, checkout, thank you page and order status page, so they can track purchases. They run in a sandbox, though, which comes with limits. The main ones from Shopify’s and Google’s help:
- The URL detected inside the sandbox may be a sandbox version rather than the main window’s URL. Shopify recommends taking the URL from the page_viewed event, so turn off GA4’s automatic page views and resend them with page_location from page_viewed
- Some GA4 features, such as automatically collected events and enhanced measurement (outbound link clicks, for example), may not work
- Google lists Tag Assistant among the Google tag features that may not work with a custom pixel
- Shopify doesn’t support adding and using custom pixels, and Google says running Google tags inside custom pixels isn’t a supported implementation, so neither company’s support can help you fix issues
How to write the code and what to watch out for are covered in Shopify custom pixels.
Prevent double-counted purchase conversions in Google Ads
If you’ve also connected Google Ads through the Google & YouTube app, check that Google Ads doesn’t have two purchase conversion actions that are both Primary. Google Ads Data Manager’s help says that when the app is set up for conversion measurement, purchase conversions from Shopify’s “Checkout completed” event are also sent to Google Ads server-to-server and deduplicated against the Google tag’s.
Purchases imported from GA4 may also be in Google Ads. If both the app’s purchase conversion action and the GA4-imported one are Primary, the same purchase is counted twice and Smart Bidding learns from inflated numbers. In your Google Ads conversion actions, make sure only one purchase action is Primary and set the other to Secondary.
Common problems and how to check them
Common problems connecting Shopify and GA4 fall into four groups: no data, purchase counts that don’t match, wrong traffic sources, and tracking blocked by a consent banner.
| Symptom | Common cause | How to check or fix |
|---|---|---|
| No data in GA4 at all | Password protection (private mode) is on, or the wrong property is connected | Remove password protection. Check the connected property in the app’s settings |
| Your own visit doesn’t show in Realtime | Ad blocker, declined consent, or excluded as internal traffic | Open the store in another browser and accept consent. Check your data filter state |
| More purchases than Shopify orders | Purchases sent from both the app and GTM (theme or custom pixel) | Check the transaction ID format in an exploration. Send purchases from one route only |
| Far fewer purchases than Shopify orders | An old-style purchase tag stopped working, or the tag doesn’t run on the thank you page | Check how purchases are being sent. Match by order number |
| Lots of payment gateway or “(not set)” sources | No unwanted referrals listed, or redirects dropping UTMs | Set up List unwanted referrals. Check ad landing URLs |
| Unfamiliar strings in page URLs | Sandbox URLs from a custom pixel | Send page_location from page_viewed |
| Fewer visits from the EU and UK only | Visitors declining in the consent banner | Declined visitors are correctly left out. Check your banner settings |
To check traffic sources, open Reports > Generate leads > Traffic acquisition in the left menu (or Life cycle > Acquisition > Traffic acquisition, depending on the property), and switch the dimension at the top left of the table to Session source / medium.
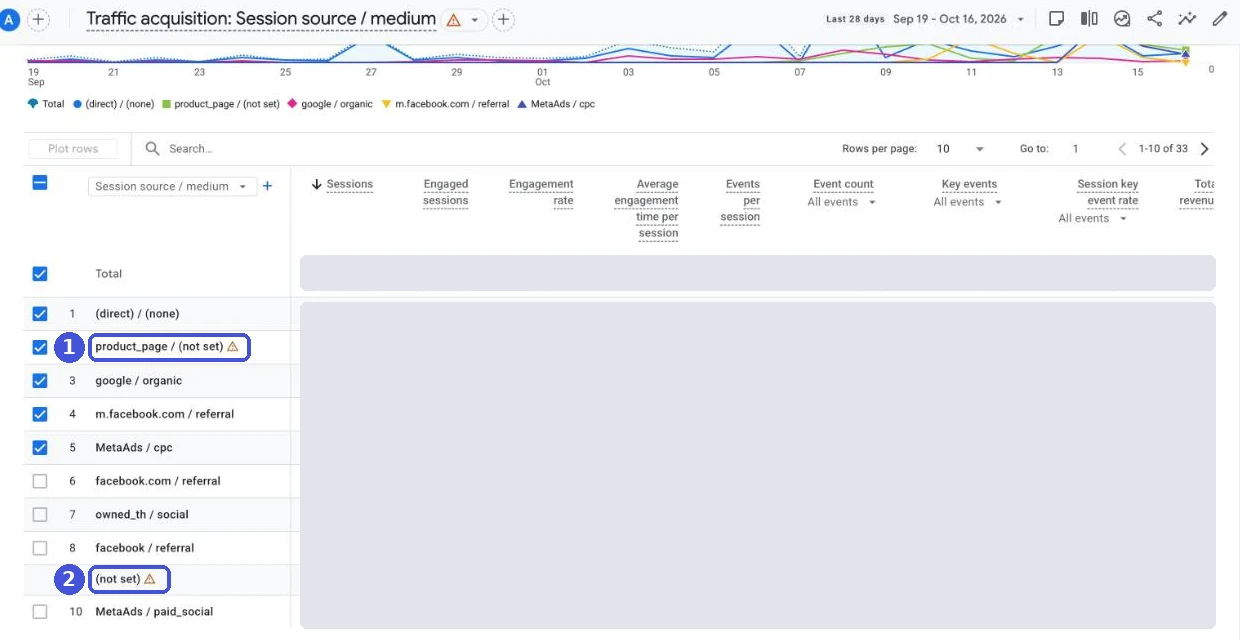
Why sources skew toward “(not set)” or “direct” is covered in GA4 (not set) and direct traffic.
Double counting usually comes from tags left in the theme
Double-counted purchases happen when old GA4 tags are left in the theme or a custom pixel on top of the Google & YouTube app connection. In our experience, it’s the most common cause. Shopify’s help also says to manually remove existing pixel code from theme.liquid, checkout.liquid (Plus only) and checkout Additional scripts.
Purchase counts already recorded in GA4 can’t be corrected later. A data deletion request can remove parameter values, but the events still count in your metrics. Note the date you fixed it, and don’t compare numbers before and after directly.
After adding a consent banner, check that declining actually works
After adding a consent banner, check two things separately: that the banner appears, and that declining actually stops data from going to GA4. A visible banner doesn’t prove the decline is respected.
On Shopify, in markets set to require consent (such as the EEA and the UK), web pixels run only when visitors have given the required permissions. The Google & YouTube app and custom pixels follow this setting; tags pasted directly into theme code don’t. If you run GTM or Google tags in a custom pixel, you have to write the Consent Mode code yourself.
Sources
- Shopify: Set up your Google tag (Google Analytics Help)
- Shopify event parameters (Google for Developers)
- Shopify (Google Ads Data Manager Help)
- Limitations of using a custom pixel for conversion measurement on Shopify (Google Analytics Help)
- Set up Analytics for a website and/or app (Google Analytics Help)
- Setting up Google Analytics 4 (Shopify Help Center)
- Google Tag Manager (Shopify Help Center)
- Acquisition reports (Shopify Help Center)
- Pixels overview (Shopify Help Center)
- Managing custom pixels (Shopify Help Center)
- Creating a Google Tag Manager custom pixel (Shopify Help Center)
- Non-Plus - Upgrading and replacing your Thank you and Order status pages (Shopify Help Center)
- Monitor events in DebugView (Google Analytics Help)
- [GA4] Minimize duplicate key events with transaction IDs (Google Analytics Help)
- Exclude internal traffic (Google Analytics Help)
- Identify unwanted referrals (Google Analytics Help)
- Data-deletion requests (Google Analytics Help)
- Data retention (Google Analytics Help)
FAQ
How do I connect Google Analytics 4 to Shopify?
Install Shopify's Google & YouTube app, then on the app's Overview page, find the section for setting up Google Analytics 4, select your GA4 property and connect it. The Google account you use needs Editor access or higher on that property. Once connected, the Google tag is added to your store and ecommerce events are sent automatically.
Should I use the Google & YouTube app or Google Tag Manager for GA4?
Use the Google & YouTube app unless you have a specific reason not to. Shopify recommends its built-in integration and warns that adding Google Analytics through GTM as well can result in duplicate tracking. If you use GTM, add it as a custom pixel under Settings > Customer events, not in your theme, and build GA4 events from Shopify's standard events. In that case, don't connect GA4 in the app. Note that Google says running Google tags inside Shopify's custom pixels isn't a supported implementation.
Where do I paste my GA4 measurement ID (G-) in Shopify?
If you connect the property in the Google & YouTube app, you don't need to paste it anywhere. If you can't connect because you lack access, or you want to send data to more than one property, go to the app's Settings page, click Manage in the Google tags section, and add the Google tag manually. Pasting it into your theme code isn't recommended, because tags there don't run on checkout or the thank you page.
I connected GA4, but no data shows up. Why?
First check whether your online store is password protected. Shopify's help says Google Analytics can't track events until you deactivate private mode. Then check whether your own visit appears in GA4's Realtime report. Other causes include a connection to the wrong property, declining analytics in a consent banner, and ad blockers.
Why don't GA4 purchases match my Shopify orders?
GA4 records a purchase when the tag runs in the buyer's browser. Purchases where the buyer doesn't return from an off-site payment gateway, buyers with ad blockers, checkouts that happen inside AI or social apps, and subscription renewals may never reach GA4, so GA4 usually shows fewer. In one of our client stores, connected through the Google & YouTube app, 21% of orders were missing from GA4. If GA4 shows more purchases than Shopify, suspect double counting from both the app and GTM. Either way, check by matching order numbers against GA4 transaction IDs one by one.
Why doesn't Shopify sales match GA4 revenue?
Because they're defined differently. The purchase value the Google & YouTube app sends to GA4 is after item and order discounts, and excludes shipping and tax. When you compare with a Shopify sales metric, align shipping, tax and returns with GA4's definition first. After that, GA4 comes up short by the purchases its tag couldn't track.
- The standard way to set up GA4 on Shopify is to connect your property in the Google & YouTube app. The Google account needs Editor access or higher on the property.
- Once connected, page_view, view_item, add_to_cart, begin_checkout, add_payment_info, purchase and more are sent with no extra setup. The value on purchase and begin_checkout is after discounts and excludes shipping and tax.
- Add GTM as a custom pixel. Running GA4 through both GTM and the app double counts. Tags written directly into your theme don't run on checkout or the thank you page.
- After connecting, check Realtime, a test purchase, the transaction ID format, event data retention (14 months), internal traffic, and purchase conversions in Google Ads.
- Even with the app set up correctly, some purchases can't be tracked by a tag. Match by order number to see how many are missing.
Written byRyushi Nagata
CEO, ULTRO Inc. (Tokyo)Shopify Partner. Ryushi handles Shopify store builds, maintenance, advertising and CRM end to end, and has managed more than ¥4 billion in ad spend over his career. He holds Google Ads certifications (Search, Display, Video, Shopping, Apps, Performance Max, Measurement) and the Google Analytics certification.
How many purchases is GA4 missing in your store?
GapFill matches your Shopify orders against GA4 purchases, shows what GA4 missed, and recovers those purchase events server-side. It works alongside your existing tags, and the missing purchases report is free.